Omega Tip
In the last week of the year, we’ll continue our series on the Arduino Dock2 as a co-processor for the Omega2. This time, we’ll have the microcontroller reading a potentiometer and sending it the Omega over the UART. The Omega will host a web page that will show the potentiometer value being updated in almost real-time!
Like last week, we’ll be using MQTT on the Omega to update a running Python program with the latest readings from the microcontroller. On top of that, we’ll add a web-server to the Python code with GET endpoints to display a web page and grab the latest potentiometer reading.
Sounding a little complex? No worries, we’ll guide you through each of the steps in detail.
So, let us break down this into chunks and dive in!
To be more specific about the system: the microcontroller reads the potentiometer value and continuously transmits the reading via serial to the Omega. The Omega will be configured to automatically publishes the readings from the UART to an MQTT topic. It also runs a Python program that listens to the MQTT topic for the potentiometer readings and simultaneously hosts an HTTP server. The HTTP server has a few GET endpoints to host a web page that dynamically shows the current position of the potentiometer.
Hardware
We’ll need the following ingredients:
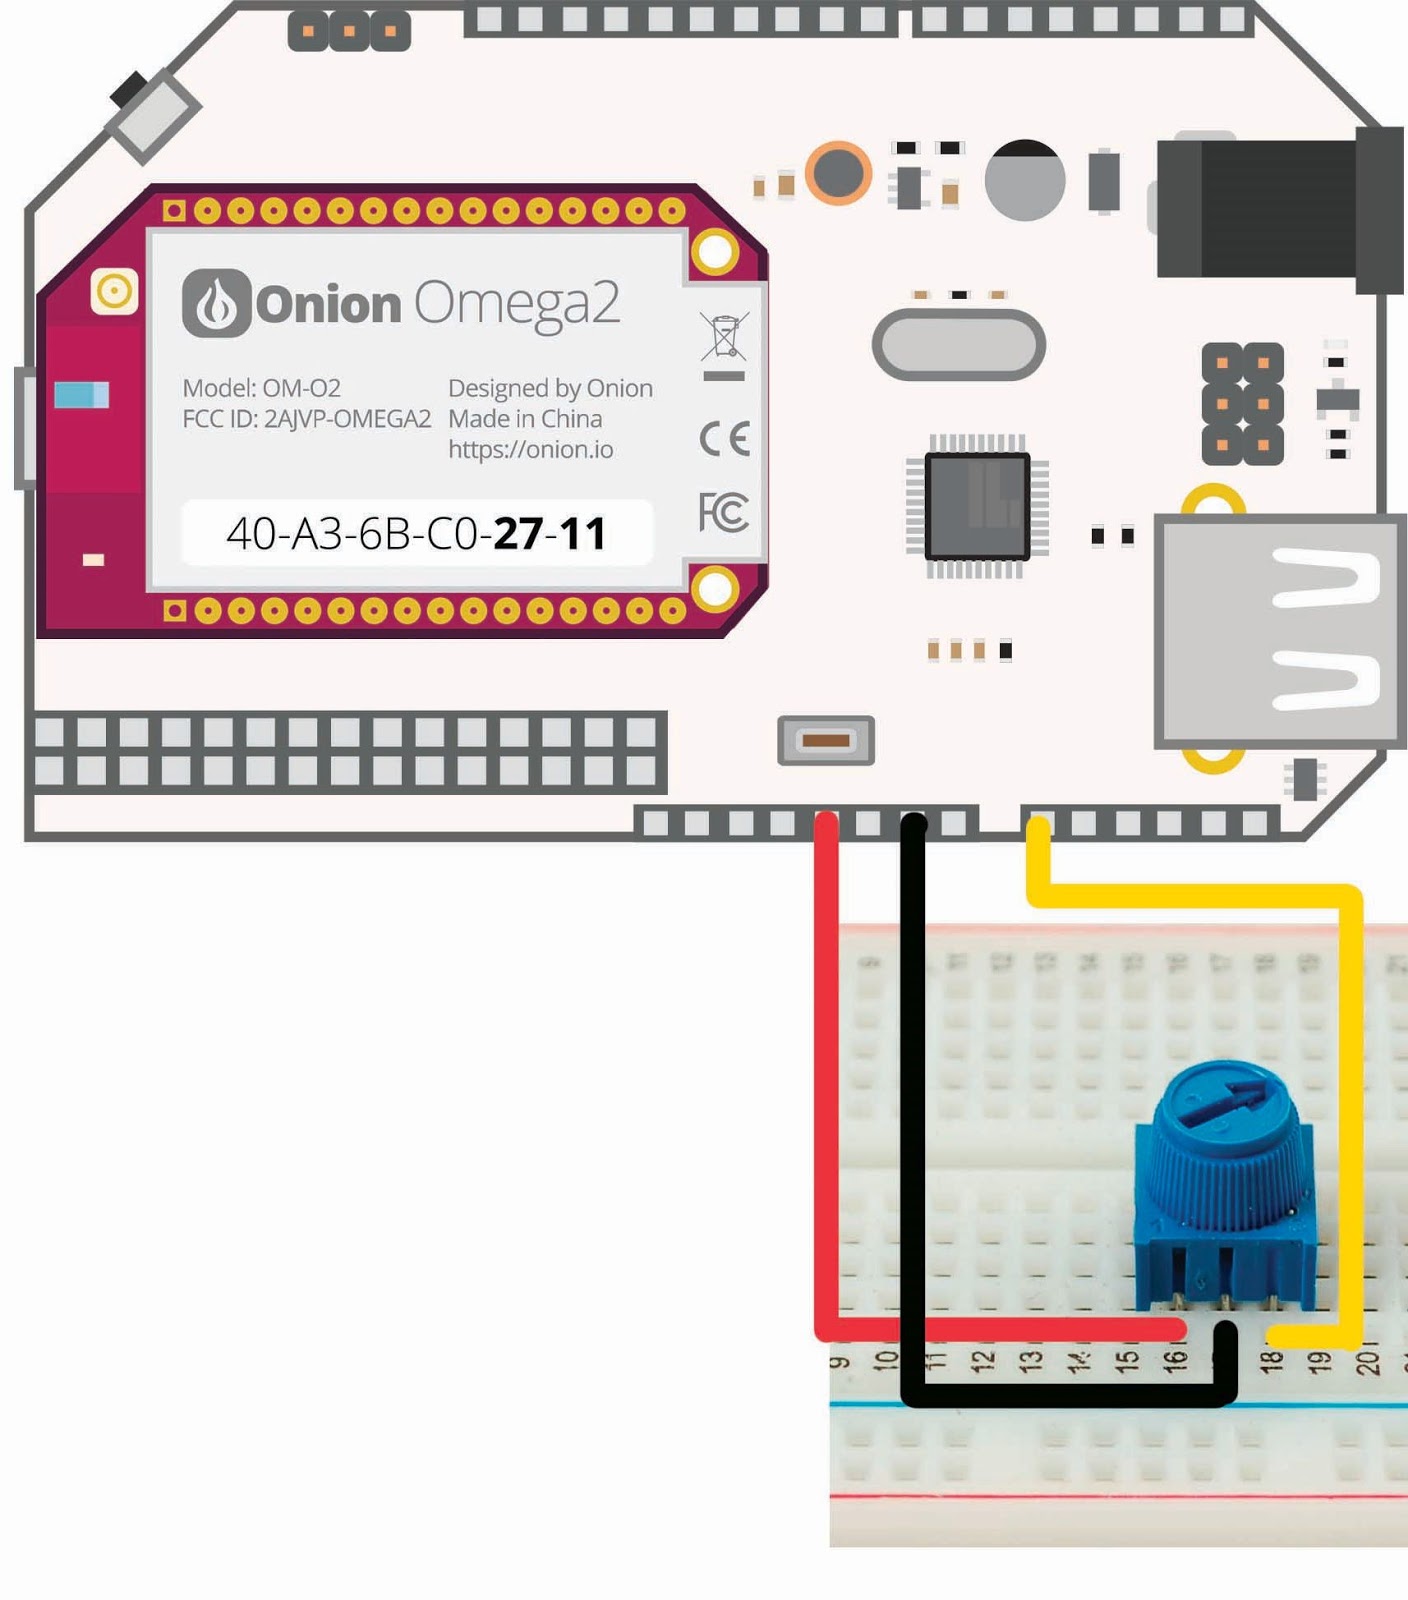
We’ll be connecting the potentiometer (10K Trimpot) to an analog pin on the Arduino Dock 2, and we’ll reference it to VCC (5V) and GND so we can make sure the data is accurate. Let’s wire everything up!
- Plug the Omega2 into the Arduino Dock 2 and power it up
- Plug the potentiometer into the breadboard and make the following connections:
- Connect the
GNDterminal to theGNDon the Arduino Dock - Connect the
Loadto theA0on the Arduino Dock - Connect the
PWRterminal to the5V (VCC)on the Arduino Dock
Installation
Before we proceed to the actual programs and their description, let’s ensure that we have all of the programs we’ll need. We need to install several packages, so here we are:
opkg update
opkg install arduino-dock-2 libwebsockets-openssl mosquitto-ssl mosquitto-client-ssl
opkg install git git-http ca-bundle
opkg install python-light
opkg install python-pip
pip install --upgrade setuptools
pip install paho-mqtt
All of the code for this week’s tip is available on Github. Take a look at our article on using GitHub for details, but if you’ve followed the instructions above, you can run the following to clone the code to your root directory:
cd /root
git clone https://github.com/OnionIoT/Omega-Dial.git
Microcontroller Sketch
Now that the hardware part is done and the software packages have been installed, let’s go ahead and write Arduino Sketch C code to do the following:
- Continuously read the potentiometer value
- Constantly send the potentiometer value to the Omega via Serial
Let’s take a look at the code – also available on GitHub:
It’s pretty straightforward, isn’t it? We have a function that reads the potentiometer value and sends this to the Omega through the UART. The next step is to flash this sketch to the Arduino Dock 2; please refer to our guide on how to flash the Arduino Dock wirelessly.
MQTT on the Omega
Now, let’s take a look at the Omega portion. We’ll need to ensure all the data received on UART1 gets published to an MQTT topic. This is very similar to what we did last week, we’re just going to change the topic name to potentiometerPosition just to be accurate:
cat /dev/ttyS1 | mosquitto_pub -t potentiometerPosition -l &
This will pipe all output from UART1 to the potentiometerPosition MQTT topic. The & at the end will ensure this command runs in the background, so you’ll need to launch it before the rest on the code on the Omega.
Python on the Omega
We’ll be extending the Python program we wrote last week to host a web page as well. We’ll do this by writing code to host a web server with a few endpoints for HTTP GET requests:
/– respond with an HTML file when the Omega is accessed with a web-browser on port8080/*.js– respond with any Javascript files required by the HTML file/position– respond with JSON that holds the latest position of the potentiometer
To make this happen in the code, we first setup a TCPServer on port 8080, and assigning the PotentiometerHTTPHandler class as the request handler class for the server.
The PotentiometerHTTPHandler class is an extension of the existing SimpleHTTPServer class. This allows us to simply write a do_GET()function, and the code in that function that will execute whenever the server receives an HTTP GET request. Inside our implementation ofdo_GET(), we define different actions to be taken based on the URL (path) of the request:
def do_GET(self): if self.path == '/position': print "GET request: returning position %d"%(position) self.send_response(200) self.send_header('Content-Type', 'application/json') self.end_headers() response = {"position":position} self.wfile.write(json.dumps(response)) return elif self.path == '/': f = open('index.html') self.send_response(200) self.send_header('Content-type', 'text/html') self.end_headers() self.wfile.write(f.read()) f.close() return elif self.path.endswith('.js'): f = open(self.path[1:]) self.send_response(200) self.send_header('Content-type', 'application/javascript') self.end_headers() self.wfile.write(f.read()) f.close() return |
If the path is <Omega address>:8080/position, the do_GET function will create an HTTP response that holds the current position of the potentiometer as a JSON object. Alternatively, if the path is just / as in just the <Omega address>:8080/, the do_GET function will respond with the index.html file that’s located in the same directory (more on this later). The HTML file makes use of two Javascript libraries, it will ask the server (the Omega) to provide these, so for any requests with a path that ends with .js, the do_GET function will attempt to respond with the requested Javascript file from the same directory. We’ll need to be very careful to ensure our HTML file only asks for JS files that our Omega already has!
You will also notice that the MQTT setup and callbacks are the same as last week but this time we use a non-blocking loop as we want the MQTT connection and the TCP server work together simultaneously, and the TCP server has its own blocking network loop.
HTML on the Omega
So we previously mentioned that HTTP requests to the Omega on port 8080 will yield a web page. Let’s take a look at that index.html code – also available on GitHub:
On the HTML side, it uses a jQuery Knob to create and style a visual representation of the potentiometer value. It also contains some Javascript code, the first part configures the jQuery knob and the second part is where the magic happens, let’s take a closer look:
var interval = 100; // continuously run this code setInterval(function () { // http get request to /position endpoint $.get("/position", function (data) { // assign position from response to the dial $(".dial").val(data.position).trigger("change"); }); }, interval); |
The code above will ensure that the function defined in the first argument of the setInvterval function will be executed every 100ms, or 10 times a second. The code that’s being executed will issue an HTTP GET request to the endpoint /position on the same server, and will then update the jQuery Knob with the value. Basically, the GET request is issued 10 times a second in order to obtain almost real-time potentiometer data from the Omega, and display it nicely.
Putting it All Together
And now you’re all set! It’s time to go ahead and start publishing the microcontroller data to our MQTT server, host the HTTP server and host the web page to monitor the current position of the potentiometer. For that, just run the following commands:
cat /dev/ttyS1 | mosquitto_pub -t potentiometerPosition -l  &
python potentiometerServer.py
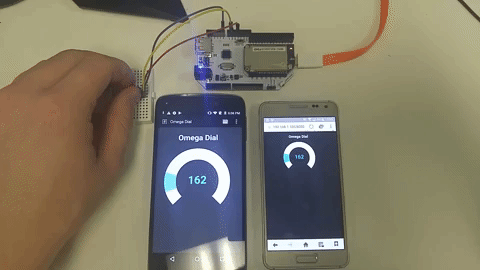
Now go to your browser and punch in http://omega-XXXX.local:8080/, where XXXX are the last four digits in your Omega’s MAC address. Your browser should show the following:
When you turn your potentiometer you will notice that the blue indicator moves in step with the potentiometer value.
If you’re curious about the /position endpoint, in your browser you can punch in : http://omega-XXXX.local:8080/position you will just see a white screen with the potentiometer value in JSON:
{"position": 738}
So, let’s cover what we’ve learned this week:
- Continuously read the potentiometer input and communicate the results to the Omega via Serial Communication (UART)
- Setup the MQTT server and publish data to a topic
- Host the Python
SimpleHTTPServerto implementHTTP GETendpoints to create a web page to display the potentiometer position in real-time!
Now it’s your turn to use this and make some creative projects on your time off. If you make something wicked based on this tip and tweet it to @OnionIoT, we’ll feature it here and you’ll get our 2BT featured project prize of a FREE Omega2+, a Dock of your choice, AND free shipping!
Happy holiday hacking!