Omega Tip
Omega2 Print Server
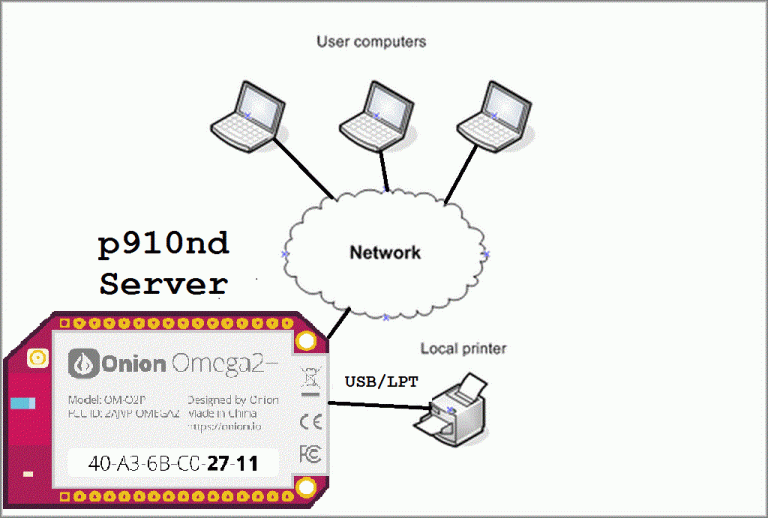
In this week’s tip, we’ll guide you through setting up a Print Server on your Omega2 in just a few quick steps! Before we go on to the actual procedure, let’s discuss what a print server is and for what it is used. In this scenario, a print server is a physical device that that is connected to the printer with a cable, and creates a virtual “bridge” through the network between a computer and the printer. So we’ll be turning a regular, old wired printer, into a network printer with the magic of the Omega2!
To make this happen, we’ll configure the p910nd print daemon. Print jobs will be sent from your computer to the Omega2 where they will be processed and passed along to the printer. The installation won’t take longer than 20 minutes, so get comfortable and let’s rock!
Installation
In short, we will perform the following operations:
- Install, configure, and start the
p910ndserver on the Omega2 - Install the corresponded printer driver on the client’s machine
- Assign Omega’s IP to the print server configured earlier
So, let’s dive in! We’ll need the following ingredients:
- Omega2/2+
- One of the Docks: Expansion Dock, Mini Dock, Power Dock 2, Arduino Dock2
- Printer with USB compatibility and A/B USB cable
So, let’s power up you Omega2 and ensure that you have the latest firmware installed as it contains almost all the necessary packages. Now, connect the printer to your Omega2 and ensure that the directory /dev/usb is populated by lp0 and lp0 ports. The next step is to install p910nd package but first, make sure that you have enabled the offficial LEDE package repos. Now run the following command:
opkg install p910nd
Once installed, we need to edit the configuration file of the server so that it allows printing. The file is located at /etc/config and called p910nd. Originally, it will look like this:
config p910nd
        option device        /dev/usb/lp0
        option port              0
        option bidirectional 1
        option enabled       0
We will enable the printing option by changing option enabled 0 to option enabled 1 and restarting the service with:
/etc/init.d/p910nd restart
It is very important to enable the service, otherwise your Omega will receive print requests but will not be able to ask the printer to print! You can read more about the nitty-gritty of the configuration file on the official OpenWRT page. And that’s it on the Omega side!
Client Configuration
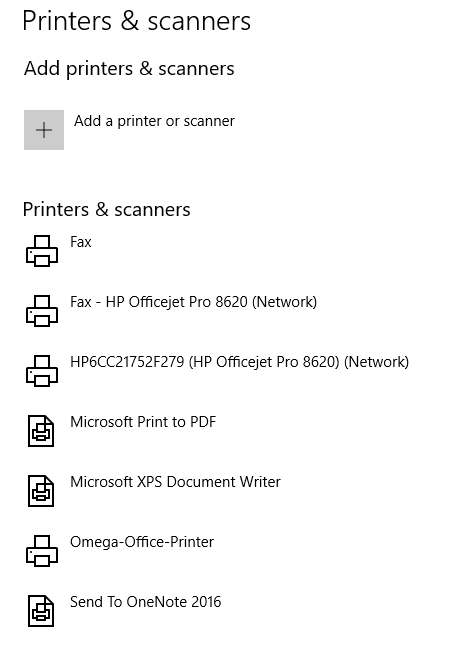
Now it’s the time to configure the client’s side. For the configuration of the pinter for your operating system, please take a look at the OpenWRT guide and scroll down to the Configuration Part 2 - The Clients. Follow the installation process that corresponds to your computer. It is very important to install the correct driver for your specific printer model and input the IP address of the Omega2. You can find your Omega’s IP address by following our guide on finding the Omega’s IP address. For example, we access our print server on a Windows 10 machine, here’s what it looks like in the Printers and Scanners section:
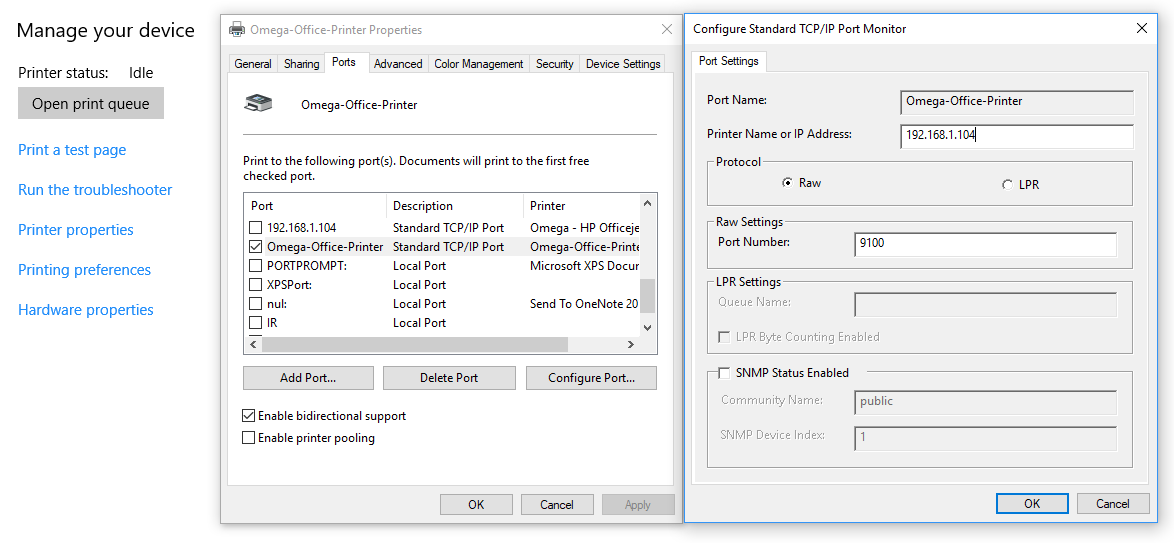
Also, here is the properties of our setting. Please note, the IP for your setup will very likely be different:
After you have configured the server, you’ll be able to print a test page! And now, your USB wired printer is available through the network, no more cables!
Troubleshooting Tips
If you were unsuccessful in setting up a print server, please check the following:
- Ensure that you have installed the
p910ndpackage (see the Installation section) - Check the physical connection between the Omega2 and the printer
- Check your
p910ndconfiguration file; compare it with the edit that was outlined in Installation process and restart your service - Make sure you enter the correct IP address for the Omega2 in the
TCP/IPconfiguration of the server - Keep in mind, it is very important to install the proper printer driver (e.g corresponded to your printer model) on your client machine
Happy printing!