The second bullet of this week’s 2-Bullet Tuesday! Check out the first bullet here. Subscribe to receive the newsletter on the 2-Bullet Tuesday page!
Omega Tip
Creating Omega2 Circuits in Fritzing
This week we’ll cover how you can use Fritzing to create circuits that include the Omega2! Fritzing is a popular open source program that, among other things, makes it easy to document and share prototype circuits in a visually clear and understandable way.
It’s also possible to create your own parts and components. Thanks to the amazing Omega2 community, Fritzing models for the Omega2 and the Omega2 on an Expansion Dock are now available. Special thanks to Fritzing forum users vanepp and jaremi for their work on the models!

Let’s dive in! You can download and install Fritzing from their official website. It is free but we encourage you to donate to this awesome open source project. Follow their instructions for installation on your system.
Now, it’s time to download the Fritzing models of Onion Omega2 and Omega2 on the Expansion Dock. You can grab them by going to our Fritzing-Models GitHub repo, and simply hitting Download Zip. Unpack the file and you are ready to go!

Guess what’s next? Right, importing our new Omega models into Fritzing. Open Fritzing and in the top right corner you’ll see something like this:

Now, in the same row where it says Core Parts, click this button: and go to the first tab named Import. Navigate to the directory where you unzipped the two model files. Import the files one-by-one. You can now find the models under the MINE tab:

Fun part time! You can create your own diagram. Let’s make a breadboard diagram of last week’s DHT11/DHT22 sensor circuit:
- Select Breadboard mode in Fritzing:

- Select the MINE tab, click and drag the Onion Omega2 with Expansion Dock model anywhere you like on the screen
- In the search pan, type RHT03 (another name for the DHT22 sensor) and hit enter. You will find the temperature sensor. Again, click and drag it, and place it somewhere on the breadboard. You’ll know the sensor is properly placed if the four breadboard rows turn green:

- The last component that we are going to add is the 10Kohm pull-up resistor. You can type “resistor” in the search pan and place it on the breadboard.
- You can change the value of the regular resistor. From the WINDOW tab select Inspector. Now, left-click on the resistor and set desired resistance:

The final step is to connect the components! To connect things together with jumper wires, simply click in the place you want your wire to start, and drag it to the end point. Pretty easy! You can also change the color of the wire to make your diagrams even more readable. Just right-click on the wire:

Let’s do the wiring:
- Connect GND, pin 4 (far right) to GND
- Connect Vcc, pin 1 (far left) to 3.3V
- Pull up the data pin by connecting pin 2 (the data line) and pin 1 (Vcc) with a 10kΩ resistor
- Connect the data line, pin 2 to any GPIO on the Omega (we used GPIO19)
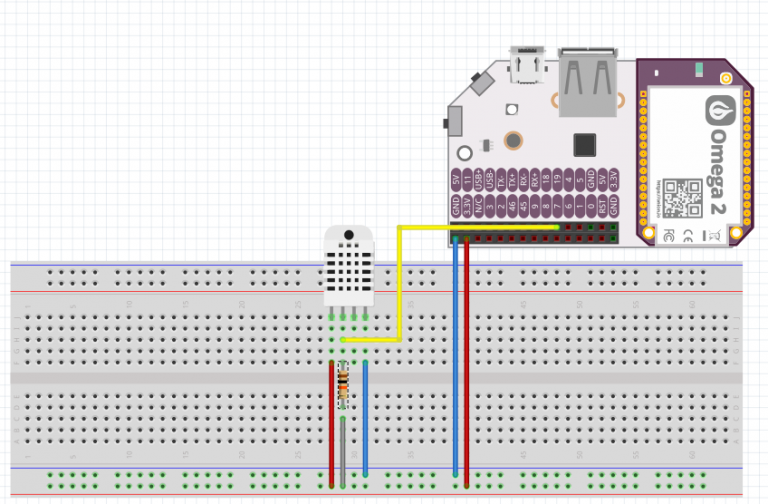
Your final product should look something like this:

You can find the Fritzing model we made for this example in the dht-sensor GitHub repo. Happy Fritzing!
Thanks for reading & have a great week!
Have you seen the Omega2S, the smaller and surface-mount version of the Omega2 for high volume commercial and industrial OEMs? See our Omega2S page for more details!
Let us know what kind of stuff you would like to see featured on 2-Bullet Tuesday! Send a tweet to @OnionIoT with your suggestions!
P.S. We’re going to be at the World MakerFaire in New York this September! Come by and see us!
