Omega Tip
Without further ado, here is the official guide on using the 3G Cellular Expansion!

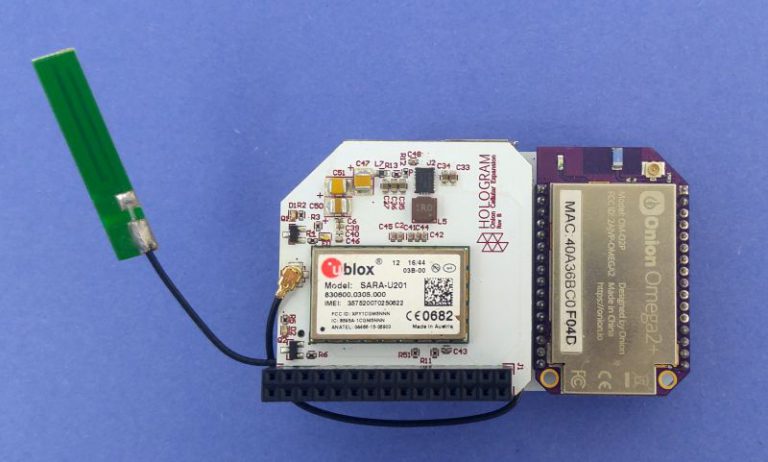
The 3G Cellular Expansion features a u-blox 3G module that adds cellular connectivity to the Omega2. Having this expansion is extremely handy when you need internet access on your Omega and you’re nowhere near a WiFi network. This is especially useful for outdoor sensors and the like!
Let’s get started!
SIM Card Activation
Your Cellular Expansion will come with a Hologram SIM card, so the first step is to activate the SIM card on Hologram’s network. But let’s first create a Hologram account. Please follow the guide on how to register for an account. Now you can login and activate your sim card, choose the plan that you’d like and you are all set to go!
Hardware
We will need the following ingredients:
- Omega2 or Omega2+
- A Dock with an Expansion Header:
- Expansion Dock
- Arduino Dock 2
- Power dock 2
- Note: to properly power on the Cellular Expansion, the Power Dock must be powered by a battery only. Once the Cellular Expansion is on (the LED is on), a MicroUSB may be plugged in.
- 3G Cellular Expansion
- Discontinued and no longer in production
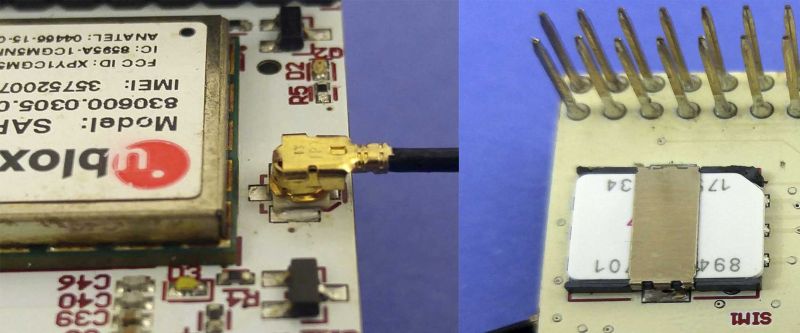
- A Hologram SIM card
Now it’s time to connect things together:
- Plug the Omega2 into the Dock
- Plug the 3G Cellular Expansion into the Dock’s Expansion Header
- Make sure the antenna is plugged into the expansion also
- Plug the SIM card into the Cellular Expansion’s SIM card slot, located on the bottom
Check that the expansion was recognized by the Omega by issuing the following command:
dmesg | grep ACM
You should see the following:
[   11.021382] cdc_acm 1-1:1.0: ttyACM0: USB ACM device
[   11.043248] cdc_acm 1-1:1.2: ttyACM1: USB ACM device
[   11.051054] cdc_acm 1-1:1.4: ttyACM2: USB ACM device
[   11.058358] cdc_acm 1-1:1.6: ttyACM3: USB ACM device
[   11.065832] cdc_acm 1-1:1.8: ttyACM4: USB ACM device
[   11.073322] cdc_acm 1-1:1.10: ttyACM5: USB ACM device
[   11.081208] cdc_acm 1-1:1.12: ttyACM6: USB ACM device
Installation
Now, we need to ensure that we have all of the programs and utilities that we’ll need. We need to install several packages, so here we are:
opkg update
opkg install chat comgt
Once you have installed chat and comgt, you will notice that the /etc/chatscripts directory has been created and it contains scripts named 3g.chat and evdo.chat. Your 3g.chat script will look something like this:
ABORT   BUSY
ABORT   'NO CARRIER'
ABORT   ERROR
REPORT  CONNECT
TIMEOUT 10
""      "AT&F"
OK      "ATE1"
OK      'AT+CGDCONT=1,"IP","$USE_APN"'
SAY     "Calling UMTS/GPRS"
TIMEOUT 30
OK      "ATD$DIALNUMBER"
CONNECT ' '
We need to edit this file to the following:
ABORT 'BUSY'
ABORT 'NO CARRIER'
ABORT 'VOICE'
ABORT 'NO DIALTONE'
ABORT 'NO DIAL TONE'
ABORT 'NO ANSWER'
ABORT 'DELAYED'
REPORT CONNECT
TIMEOUT 6

'' AT
'OK' ATDT*99***1#
TIMEOUT 30
'CONNECT' ''
Please note the special characters that is used in this script: ' is a single apostrophe and '' is two single apostrophes '. This is important!
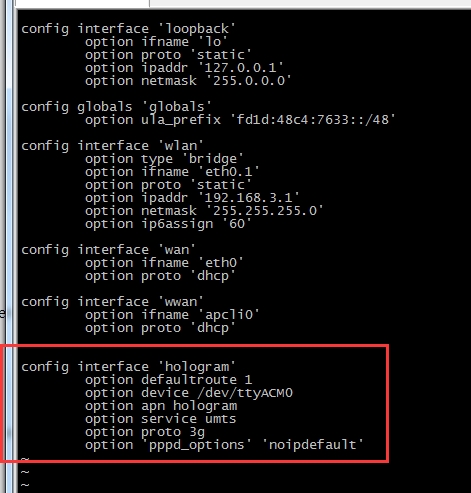
Now, we need to modify our /etc/config/network file. Please append the following to the bottom:
config interface 'hologram'
        option defaultroute 1
        option device /dev/ttyACM0
        option apn hologram
        option service umts
        option proto 3g
        option 'pppd_options' 'noipdefault'
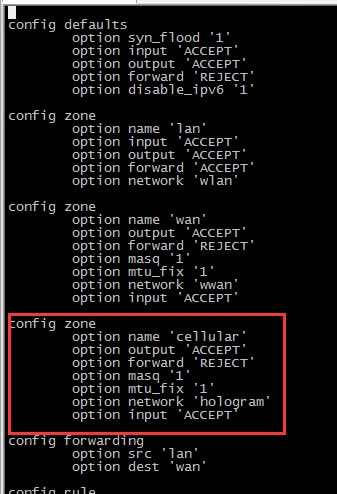
The next file we’ll modify is /etc/config/firewall. Insert the following right before the forwarding section:
config zone
        option name 'cellular'
        option output 'ACCEPT'
        option forward 'REJECT'
        option masq '1'
        option mtu_fix '1'
        option network 'hologram'
        option input 'ACCEPT'
So your firewall file would look something like this:
The last thing you need to do is to restart the Firewall and Network by issuing the following two commands:
/etc/init.d/firewall restart
/etc/init.d/networking restart
Now, issue the ifconfig command to verify the presence of a 3g-hologram interface.
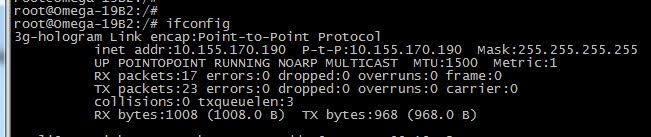
If it exists then you are all set to go ahead and use your Cellular Expansion! If you were unable to find that interface, then manually bring it up by issuing the following command:
ifconfig 3g-hologram up
Usage
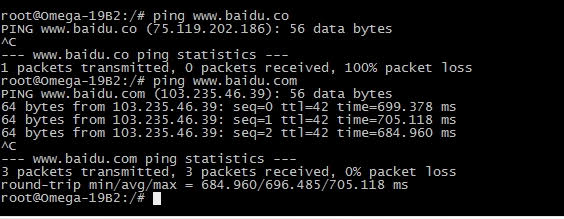
The final step to ensure that you are connected via 3G is to ping a website, please refer to the screenshot below.
Going Further
Now, that you are connected to the Cellular network you can create remote projects and make them accessible in the real-time! Happy Hacking!