
The second bullet of this week’s 2-Bullet Tuesday! Check out the first bullet here. Subscribe to receive the newsletter on the 2-Bullet Tuesday page!
Omega Tip
Reading Temperature and Humidity from DHT11 & DHT22 Sensors
We liked h0l0gram’s DHT sensor program so much, that we forked his GitHub repo and made the dht-sensor program available to all Omega users! This tip will show you how to connect the DHT11 or DHT22 sensor to your Omega, and then how to install and use the dht-sensor program. If you’re curious, the source code is available on GitHub! Keep in mind that the DHT11 and DHT22 sensors are slightly different but will generally give us the same information.
Let’s connect the DHT sensor to your Omega. You will need the following components:
- Omega2 or Omega2+
- Any Dock with the Omega’s GPIOs exposed: Expansion Dock, Power Dock, Arduino Dock 2, Breadboard Dock
- Breadboard
- 10kΩ resistor
- DHT11 or DHT22 Sensor
- male-to-male jumper wires
The DHT sensor has 4 pins, but we will be using only 3 of them. Pin 3 is marked as NC which means Not Connected. You might ask, why do we even need pin 3 then? Some sources indicate that it can be used as a spare ground and other say that it has an internal resistance to VCC of around 100kOhm. But we will focus more on what this sensor can do for us, instead of the mysterious third pin.
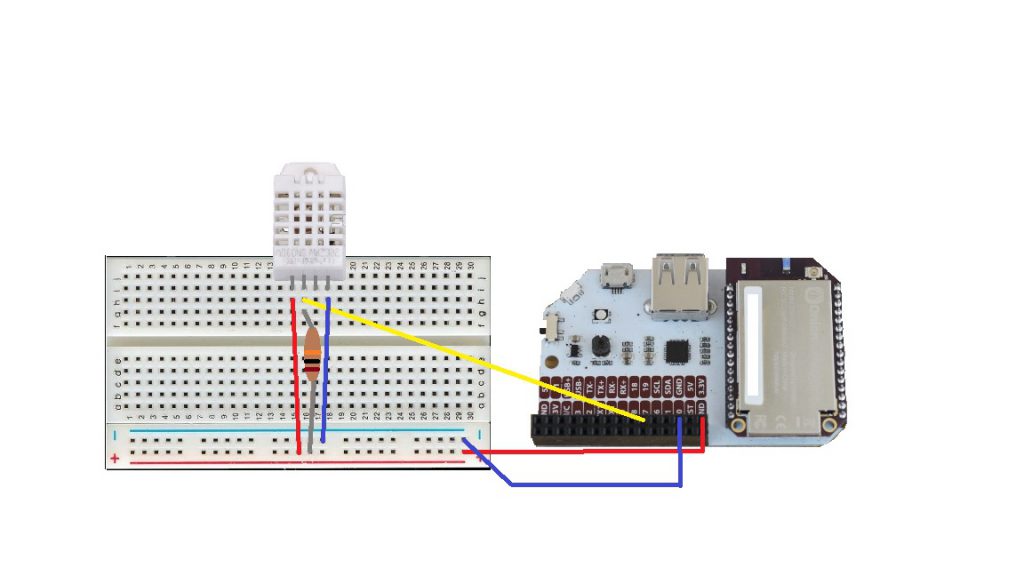
Now let’s wire everything up!
- Plug your sensor into the breadboard
- Connect GND, pin 4 (far right) to GND
- Connect Vcc, pin 1 (far left) to 3.3V
- Pull up the data pin by connecting pin 2 (the data line) and pin 1 (Vcc) with a 10kΩ resistor
- Connect the data line, pin 2 to any GPIO on the Omega (we used GPIO19)
It should look something like this:

Let’s move on to the software! Connect to your Omega’s terminal and issue the following commands:
opkg update
opkg install dht-sensor
We’ve now installed the dht-sensor program. To read the sensor data, we’ll need to tell the program:
- Whether the sensor is a DHT11 or DHT22
- Which GPIO is connected to the data line
Here is the format of the command:
dht-sensor [GPIO] [SENSOR-TYPE]
Where [GPIO] is the number of GPIO port that is used and [SENSOR-TYPE] is either DHT11 or DHT22. Keep in mind, the sensor type is entered in Uppercase letters, otherwise it will show you an error.
For example, we have a DHT22 connected to GPIO19, so our command looked like this:
root@Omega-F04D:~# dht-sensor 19 DHT22
humidity: 38.599998
temperature: 23.700001
Due to the nature of the sensor’s design, you can only read the sensor data once every one or two seconds.
Going Further
Sensor data is always useful in JSON form, especially if it’s to be sent up to a cloud platform like Ubidotsor Losant. So, we built JSON support into the dht-sensor program! Just add an additional argument:
root@Omega-F04D:~# dht-sensor 19 DHT22 json
{"humidity": 39.099998, "temperature": 22.500000}
And that’s it! We’ve learned how to read temperature and humidity data from the popular DHT11 & DHT22 sensors! With this program you can remotely monitor the climate of a particular room. This might come in handy if the room is climate sensitive (data centre, hospital, etc) and you plan to build environmental controls.
Thanks for reading & have a great week!