In this article we’re going to build a PID Controller to keep an incubator at a constant temperature, but this setup can be easily modified and the code reused for your own purposes! 

A Little Background on PID Control

First of all, what is PID anyway? PID is an abbreviation and stands for Proportional-Integral-Derivative. The name might make you say “oh man, I don’t remember calculus”, but don’t worry, we won’t be taking a deep dive into calculus, we’ll just be using PID as a tool. In our case this tool will keep our incubator close to a temperature of our choosing at all times.

PID control is a great tool to have in your toolbelt since it’s the foundation of a bunch of cool applications where minimal variation of the system is critical. For example, flight controllers, incubators, levitating ping-pong balls, cruise control, soldering irons and much more!

On-Off Control

To give you an idea of the basic principles of PID, let’s compare On-Off control and PID. The most basic and straightforward method for controlling a system is the On-Off method. Most HVAC systems, refrigerators use this method. For example in a fridge, it cools the inside until the desired temperature is reached, and then turn off the cooler, until it reaches a set amount above the desired temperature. See the diagram below:

 How PID Control is Different

PID control uses a different approach and achieves a better result. Let’s go back to our fridge example, instead of turning the cooling unit fully on and fully off, a PID controller will adjust how hard the cooling unit is working to that the temperature stays as close as possible to the desired value, with little variation:

Under the hood, what it’s doing is finding the difference (a.k.a error) between the desired temperature and the actual measured temperature, and then determining how much heating/cooling to apply to get it to our desired temperature while minimizing the overshot. So 3 “simple” words: Proportional, Integral and Derivative. Useful, right? 

PID Tuning

A PID controller takes in parameters that affect it’s responsiveness and, consequently, how much it overshoots the set-point. Notice the three different lines in the diagram above? Each of them have different tuning parameters. Usually, it requires a little bit of experimentation to tune a PID controller for your use case.

Where Can I Use PID Control?

PID control is useful in any application where it’s critical that there’s very little variation in the variable that’s being PID controlled. For example: a flight controller for quadcopters and planes, an incubator, a fermentation tank, levitating ping-pong ball, car cruise control and so on and so forth!

Ingredients

In general, for PID to work, minimum 2 things are required:

  • Something to perform measurements
  • Something to apply force

In our case we’ll be using the following ingredients:

Connecting Everything

Let’s prepare our hardware! Start by plugging the Omega2, PWM Expansion, and ADC Expansion into the Expansion Dock

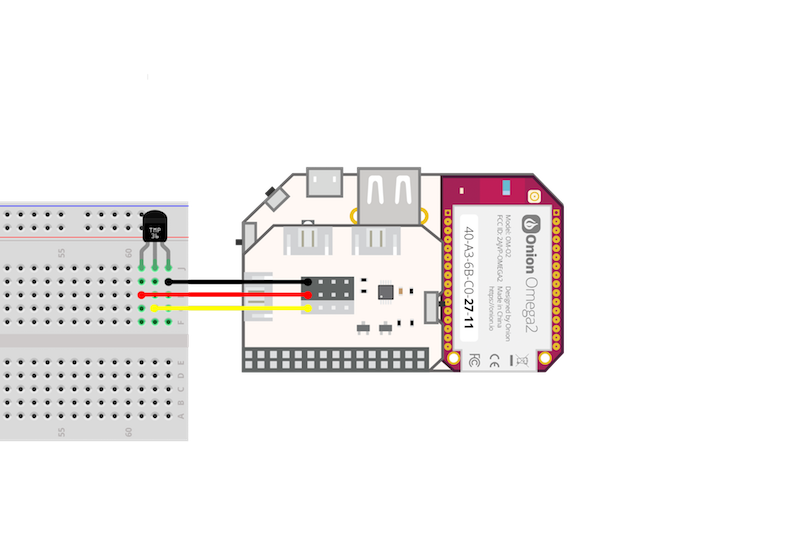
Let’s get the temperature sensor connected first:

  1. Get the TMP36 sensor flat side facing towards you.
  2. Connect the Left terminal into the 5V female connector on the ADC
  3. Connect the Middle terminal, Vout, to the Signal connector on the ADC Expansion
  4. And finally, the right terminal to GND on the ADC Expansion

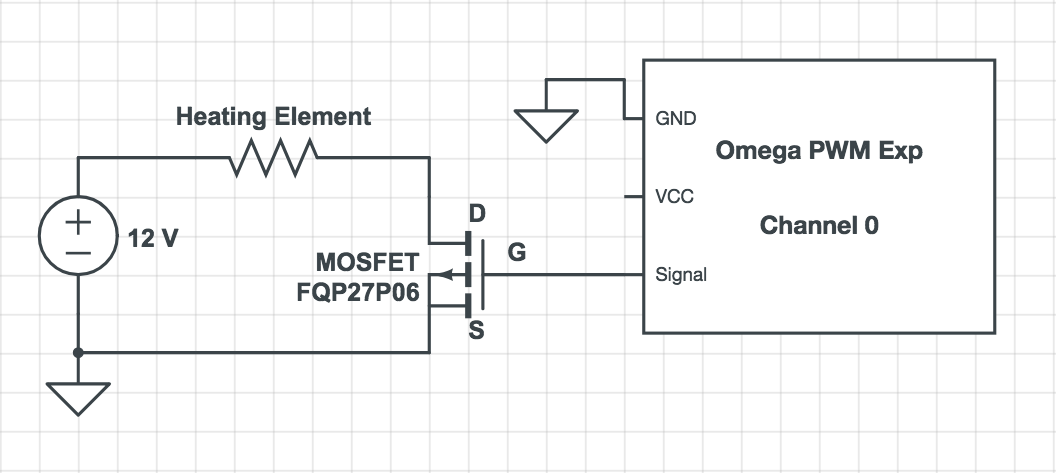
Next, we’ll connect the heating pad to the PWM Expansion through the Power MOSFET. This will allow us to use the PWM signal generated by the Omega PID Controller to adjust how much heat is produced.


Software Setup

Now we’ll need to prepare things on the software side. We’ll be using Python to implement our PID Controller. We made this choice since there’s modules available to interact with the PWM and ADC Expansions as well as modules that abstract the use of PID.

We’ll first need to install Python, connect to the Omega’s command line and run the following:

opkg update
opkg install python-light pyPwmExp python-adc-exp

Now let’s create a directory on your Omega’s filesystem to hold our code:

mkdir /root/pid-controller
cd /root/pid-controller

Finally, we’ll download the PID Python module straight from GitHub:

wget https://raw.githubusercontent.com/ivmech/ivPID/master/PID.py
 

The Python Program

Now that we have prepared an environment for our PID adventure, let’s go ahead and write our source code. The goal of the program is to use the PID control technique to keep the temperature of the incubator at a desired value by controlling the output of the heating pad. To make this happen we’ll need to:

  • Measure the temperature using the ADC Expansion 
  • Feed the temperature reading into our PID controller
  • Set the heating pad strength (Channel 0 on the PWM Expansion) to the value outputted by the PID Controller

Create a file named pid-control.py and throw in our code:

Running the Program

We’ll now run our program and make sure it keeps our incubator at the desired temperature. Run the following command to start:

python pid-control.py

It will continuously output the temperature measurement as well as the PWM duty cycle the PID Controller has determined will be optimal for achieving the set-point temperature.

Tuning the PID Controller

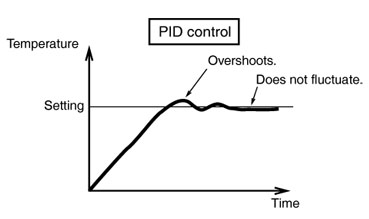
Now we’ll need to tune our PID controller so that it keeps the incubator at as close as possible to a temperature of our choosing at all times, without much fluctuation:

The Python program reads it’s configuration data from a file on the Omega, /tmp/pid.conf. It’s organized as a CSV with the following configuration:

[Measurement Set-Point],[P Gain],[I Gain],[D Gain]

The program will automatically create this file and populate it with default values if it doesn’t exist:

35,10,1,1

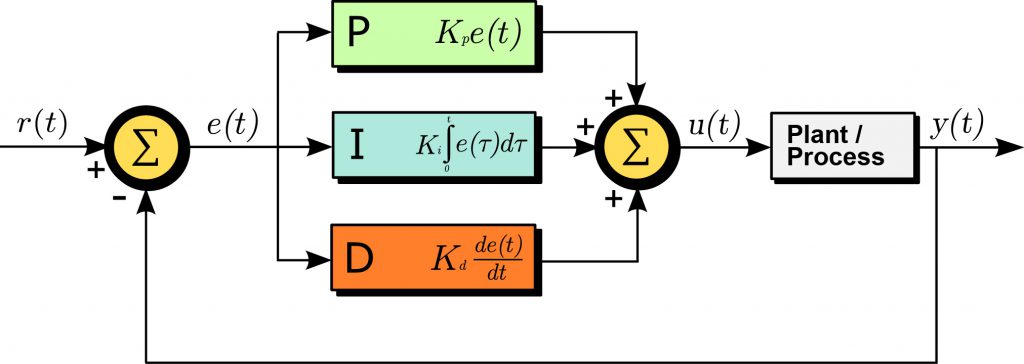
Meaning it defines 35 as the set-point for the PID Controller, and then 10, 1, and 1, for the P, I, and D gain values.

You can update the configuration file on the fly while the program is running and it will pick up the changes!

Ok, now let’s actually tune our controller:

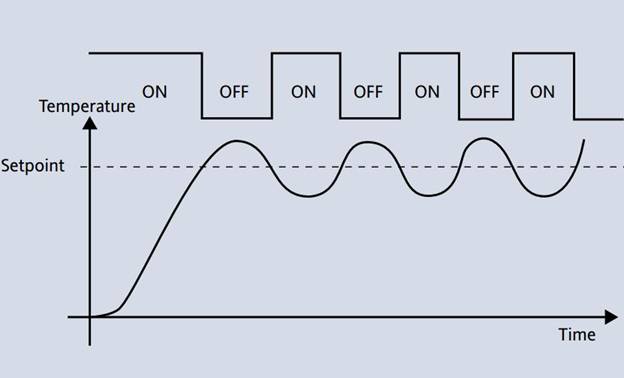
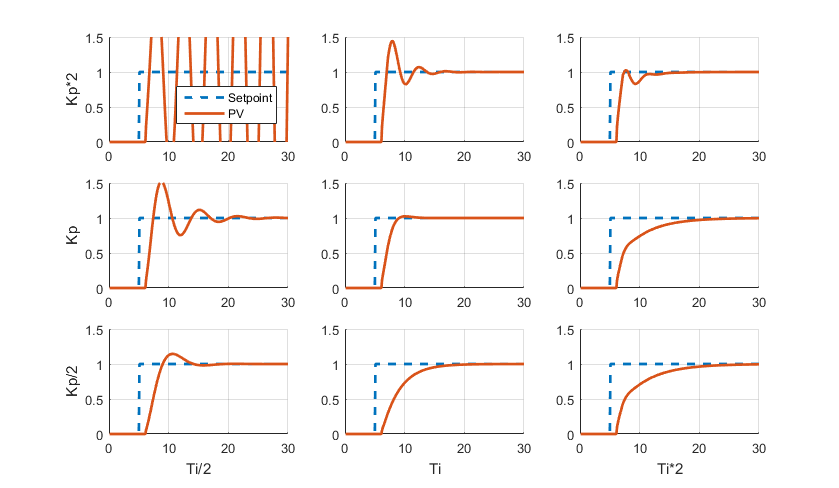
We’ll start by setting all the gains to zero. Next, increase the gain until you reach the point when your temperature starts to oscillate steadily around the set-point. In order to get rid of unnecessary oscillation, we’ll increase the P gain. Keep increasing the numbers and observing the output. Set P and D values to the last digits that did not cause too much oscillation. Now the I value comes into play: increase it until you reach the set-point and the oscillation becomes unnoticeable.

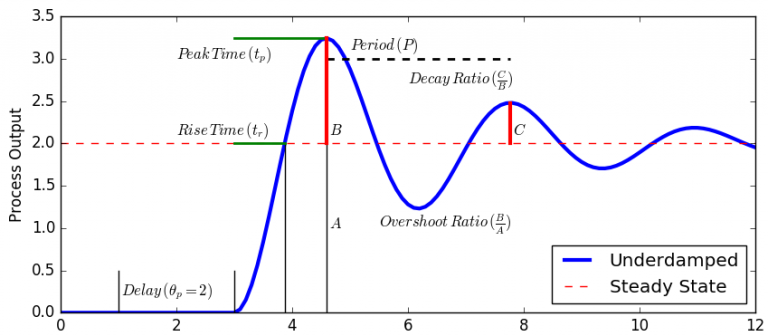
It’s ok if you still see a some oscillation or overshooting, PID tuning is an iterative game. We recommend reading more on the details of how PID works in order to have a better handle on how each gain affects the controller’s output.


What’s Next?

Now that you’ve seen how useful and not-scary PID controllers really are, we hope you’re inspired to make your own PID controller projects! Feel free to reuse our code, just don’t forget to show us your projects!

Happy PIDing 🙂