Hey there!
Welcome to 2-Bullet Tuesday, where we’ll share useful tips and awesome stuff sent in by Omega2 users all around the world. Check out creative projects and tutorials that will supercharge your IoT development!
Favorite Project
Omega2 LoRaWAN Node on The Things Network
We’ve got a super exciting favorite project this week, previous featuree Max Gerhardt is back at it again, this time making the Omega2 into a LoRaWAN node that transmits sensor data! The Omega2 acts as a LoRa node on The Things Network and transmits temperature and humidity readings from a DHT11 sensor.
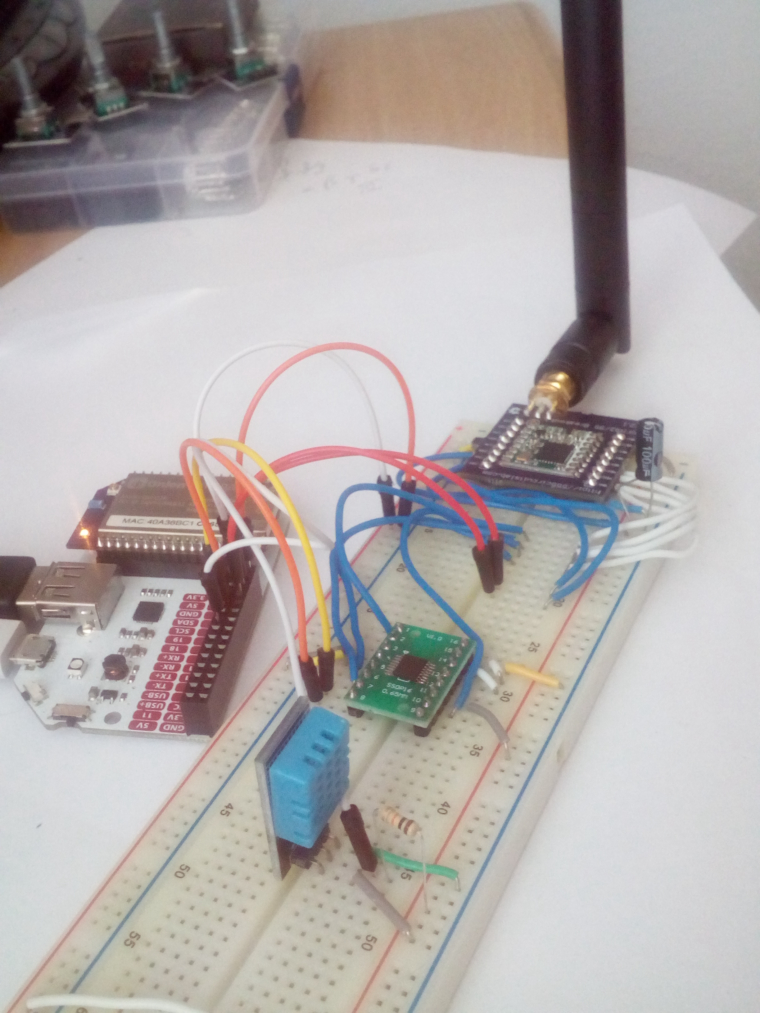
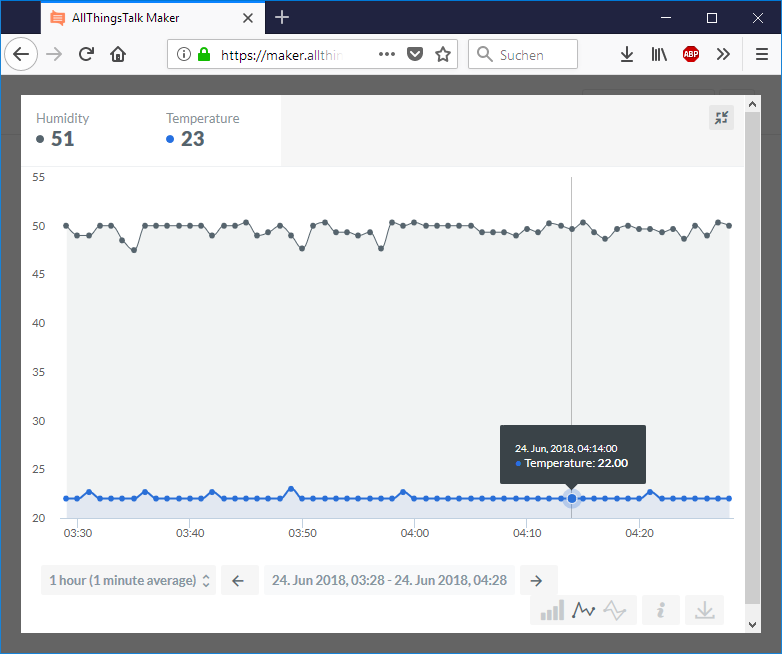
Max then used The Things Network’s payload integrations to send the sensor data to AllThingsTalk and nicely display it on a dashboard:
The guide is amazing and covers:
- Hardware setup (including Fritzing diagrams)
- Transmitting data via LoRa to The Things Network (including encoding JSON data into the CBOR format) using tools he developed
- Creating a Payload Integration to AllThingsTalk and creating a dashboard
- And of course, links to all of the GitHub repos he created along the way
Great work as usual, Max. Can’t wait to see what other projects you have cooking!
Omega Tip
This week we have a video tutorial for you on Cross Compiling C programs for the Omega2. We’ll walk you through setting up the Omega2 build system on your computer using Docker, cross compiling an example program, moving it to the Omega, and then running it! We wanted to make sure that you see the whole process and can use this as a guide for cross-compiling your own programs!
Cheatsheet
We’ve also prepared a quick cheatsheet of how to setup our build system and start cross-compiling:
There’s four steps we’ll be doing:
- Setting up the Dockerized Build System and preparing it to cross compile
- Actually cross-compiling our C program
- Getting the compiled executable to the Omega
- Running the executable
The C program we’re compiling is a simple example program that reads and displays the value of a GPIO pin on a one second interval. The program makes use of the libugpio library to access the GPIOs. The source code is available on GitHub.
Setting up the Build System
In order to get started please ensure that you have Docker installed on your computer. You can follow our earlier guide on how to install Docker or Docker’s own Get Started guide.
To make the Omega2 build system easier to share, we’ve created a Docker image with the environment and build system all configured and ready to go. The image is based on our Build System GitHub repo. Let’s pull the Docker image from Docker Hub:
docker pull onion/omega2-sourceIn order to create our own Docker container based on the image we just puslled, use the following command:
docker run -it onion/omega2-source
Now that you are inside of your very own Omega2 Build System container, use git pull to make sure you’re 100% up to date.
This is the build system that we use to make firmware for the Omega and all of the software packages. If you’re curious about changing the build system, run make menuconfig. This set of menus allows us to choose which packages we compile and which packages we include in the firmware we’re building.
Our C program uses the libugpio library to access the GPIOs so we’ll need to make sure the library is selected to be compiled in the build system. Use / to search for libugpio and it will show you in which menu it’s located. If you’re using our build system, it will be selected by default.
Press esc to exit the menuconfig and run the command make to compile the build system. Take a break as this will take some time depending on your computer’s specs. On some machines it can take a few hours.
Cross Compiling
Once the compilation is complete, we are ready to start cross-compiling! We’ll need to get the code for the C program we want to compile into the Docker container. You can directly clone our example code from GitHub:
cd /root
git clone https://github.com/OnionIoT/c-cross-compile-example.git
Along with the code, there’s a script that will take care of cross compiling our program. The script is written to be generic so you can reuse it with your own projects! When it’s run, we need to specify:
- The path to the build system
- Any libraries the program is using
Here’s the command we’ll be running:
sh xCompile.sh -buildroot /root/soource -lib ugpioThis will invoke the makefile but will make sure the cross compilers from the Build system are used in the compilation process.
Right after you’ll notice a new file called gpioRead that is now executable for Omega MIPS architecture.
Moving the File to your Omega
We’ll be using the transfer.sh service to move the executable to your Omega.
First upload the file from the Docker container to transfer.sh:
curl --upload-file ./gpioRead https://transfer.sh/gpioReadIt will print something like:
root@4be1108e1e3a:~/c-cross-compile-example# curl --upload-file ./gpioRead https://transfer.sh/gpioRead
https://transfer.sh/nYRsk/gpioRead
Now on your Omega, use this link to download that file using wget command:
wget https://transfer.sh/XXXXX/gpioRead…where XXXXX refers to the unique numerals from your upload.
In order to use it make this downloaded file executable, use the following command:
chmod +x gpioread
Running the Program
We’re finally ready to run our program. It expects a command line argument that specified the GPIO we would like to track, so to track GPIO 0, we would run the following:
./gpioRead 0It will then print out the value of GPIO 0 once a second. Try running a jumper wire from GPIO 0 to GND and then to 3.3V and seeing how the output changes.
Hit ctrl+c to exit the program.
And voila! We’ve used the Dockerized Omega2 build system to cross compile a C program and then ran it on an Omega! Use this as a starting point for all of your C adventures on the Omega.
Thanks for reading and have a great week!
P.S. Just a heads up, we’re going to be making some changes to 2-Bullet Tuesday in the coming weeks 🙂