HI EVERYONE!
Seasons greetings, hope you are all keeping warm!
Welcome back to 2-Bullet Tuesday,where we’ll share useful tips and awesome stuff sent in by Omega2 users all around the world.
Favorite Project
? Cryptocurrency Monitor ?
Our favorite project this week is an online cryptocurrency monitor made by Chuck Brown. He used his Omega to obtain the most recent cryptocurrency values and display them on the OLED Expansion. Judging by the numbers, we’re guessing it displays the value of the holdings, and not the exchange rate 🙂
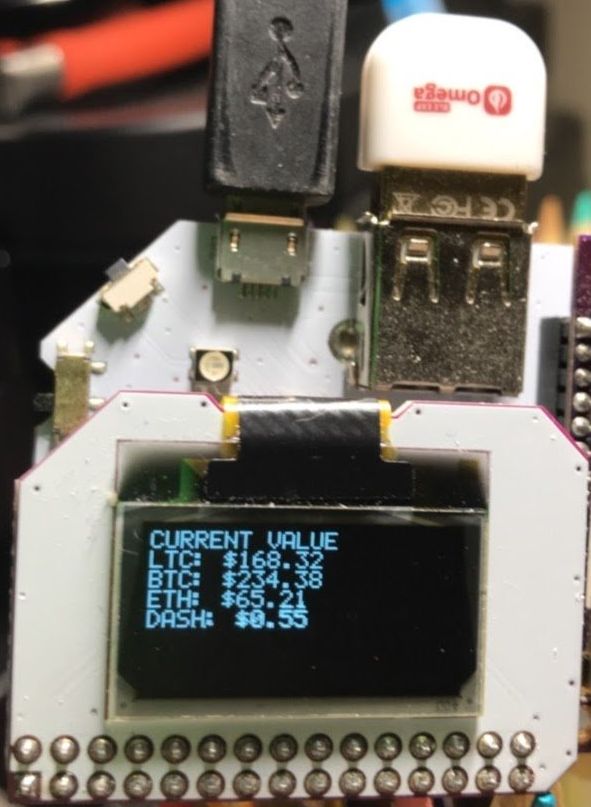
Chuck used Bash and PHP to write his program, and then created a cron job to update the values on the display automatically in a desired timeframe. What a great project, especially nowadays when the cryptocurrency market is so interesting.
Awesome work, Chuck! We love how you turn the Omega into a tool that could be used on a daily basis!
Omega Tip
MQTT Servo Controller
In this week’s tip, we are continuing our series on the Arduino Dock2 as a co-processor for the Omega2. This time, we’ll have the microcontroller reading a potentiometer and the Omega using that reading to drive a servo to the corresponding angle!
What’s extra cool about this tip is that we’ll be using MQTT to make the servo respond in almost real-time!
The microcontroller will be setup to constantly send data to the Omega via the serial UART. The Omega will be setup to automatically publish all incoming serial data to an MQTT topic. This allows us to write programs that use data coming from the microcontroller in real-time to do other interesting things. In our example, we use the potentiometer to directly control a servo on the Omega, but there’s a whole bunch of interesting things you can do with potentiometer readings in your projects!
A high-level overview: the microcontroller will read the potentiometer input and convert it to an angle for a servo (0-179 degrees), transmit the reading to the Omega via the UART. The Omega will immediately publish the message to an MQTT topic. There will be a Python script running that will subscribe to the MQTT topic and instruct the servo to move to the angle defined in the message from the topic.
Let’s dive in! We will need the following components:
- Omega2 or Omega2+
- Arduino Dock 2
- Servo (PWM) Expansion
- 10k? Potentiometer
- Servo Motor (We used a SG90 Micro Servo)
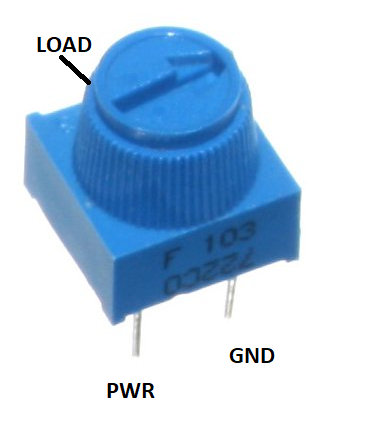
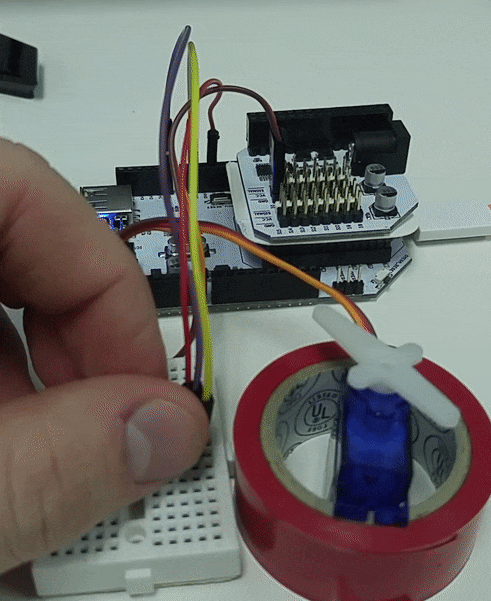
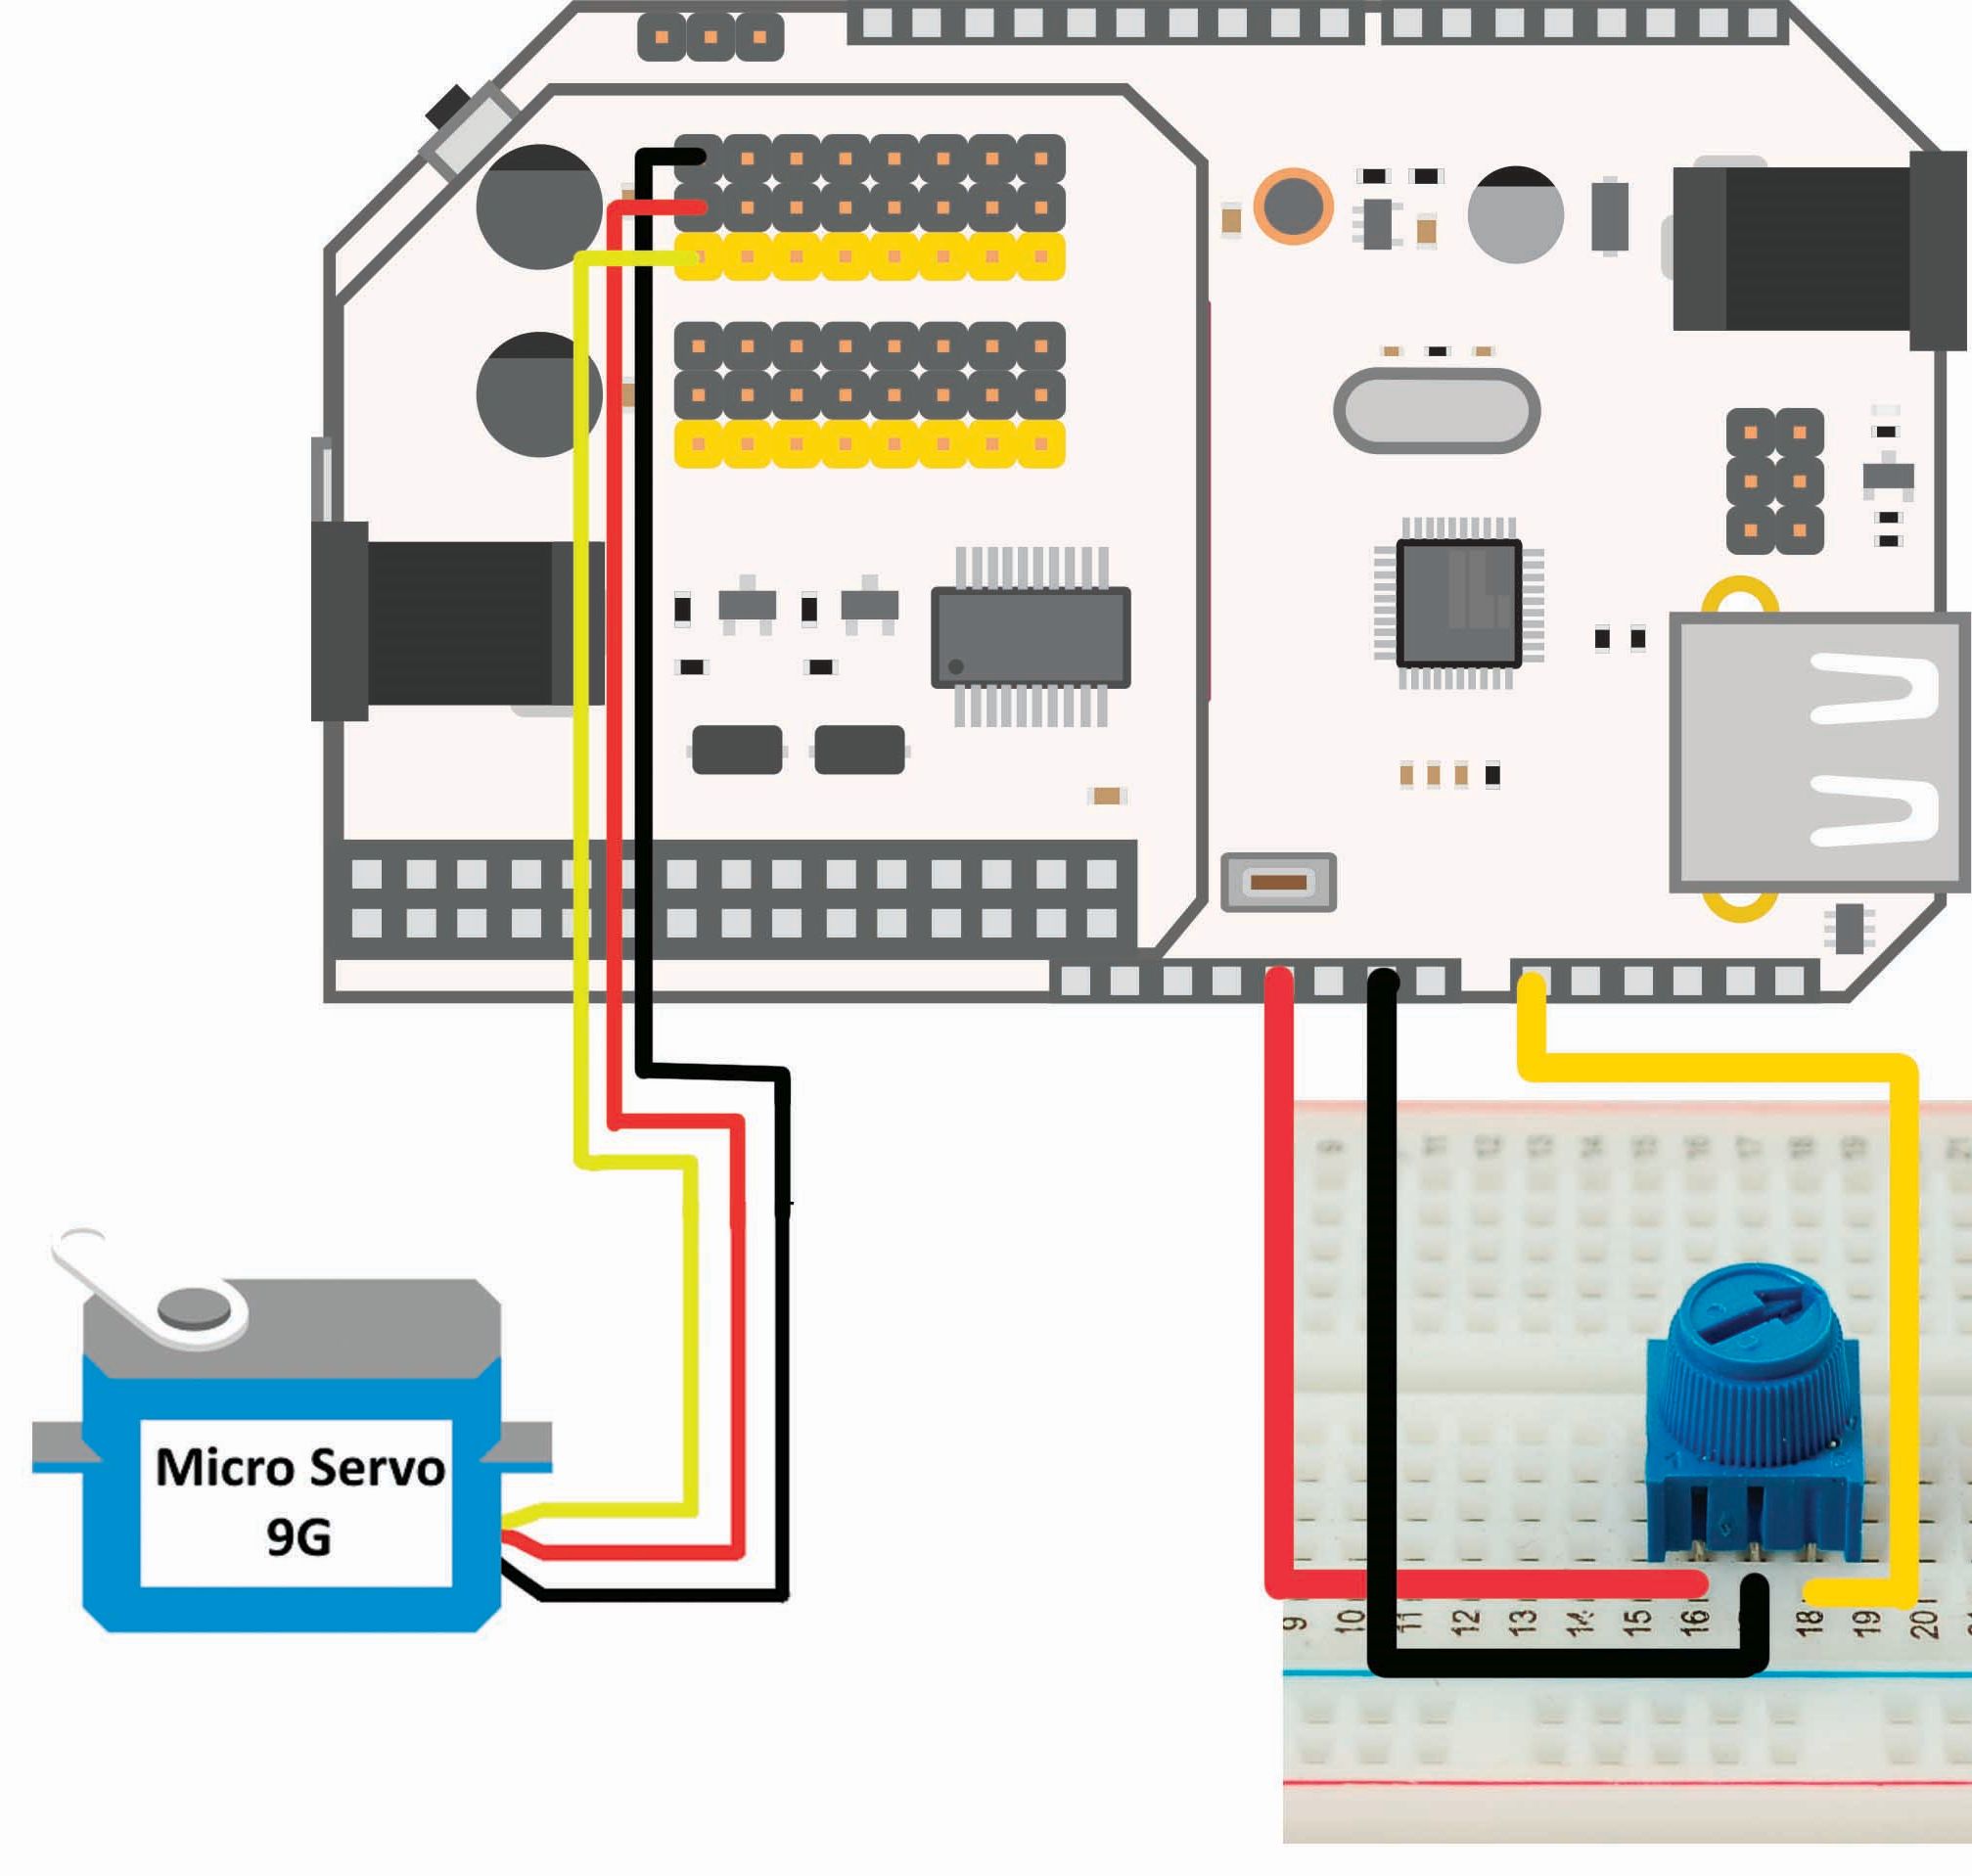
We’ll be connecting the potentiometer (10K Trimpot) to an analog pin on the Arduino Dock 2, and we’ll reference it to VCC (5V) and GND so we can make sure the data is accurate. Let’s wire everything up!
- Plug the Omega2 into the Arduino Dock 2 and power it up
- Plug the Servo Expansion into the expansion header on the Arduino Dock 2
- Important note! The barrel jack tabs on the PWM Expansion can make contact with the metal shielding of the Omega2 and Omega2+ when used with Arduino Dock2 creating a short circuit. We recommend inserting a thin plastic layer between the top of the Omega and the bottom of the PWM Expansion to avoid this contact. The contact may damage your devices!
- Plug the potentiometer into the breadboard and make the following connections:
- Connect the
GNDterminal to theGNDon the Arduino Dock - Connect the
Loadto theA0on the Arduino Dock - Connect the
PWRterminal to the5V (VCC)on the Arduino Dock
- Connect the
- Connect the Servo Motor to the Servo Expansion (Brown end to
GND, Orange end to theSignaland Red to theVCC) onS0channel
Installation
Before we proceed to the actual programs and their description, let’s ensure that we have all of the programs we’ll need. We need to install several packages, so here we are:
opkg update
opkg install arduino-dock-2 libwebsockets-openssl mosquitto-ssl mosquitto-client-ssl
opkg install python-light pyPwmExp
opkg install python-pip
pip install --upgrade setuptools
pip install paho-mqtt
Microcontroller Sketch
Now that the hardware part is done and the software packages have been installed, let’s go ahead and write Arduino Sketch C code to do the following:
- Continuously read the potentiometer value
- Convert the reading to an angle value between 0 and 179
- Constantly send the formatted reading to the Omega via Serial
Let’s take a look at the code – also available on GitHub:
It’s pretty straightforward, isn’t it? We have a function that reads the potentiometer voltage, maps the reading to an angle between 0 and 179 degrees, and sends this to the Omega through the UART. The next step is to flash this sketch to the Arduino Dock 2; please refer to our guide on how to flash the Arduino Dock wirelessly.
The Omega
Now, let’s take a look at the Omega’s role. We have two Python programs pre-written for you. Let’s take a look at the motor.py code, it actually comes from our Maker Kit guide. It implements an OmegaPwm class that can control a PWM channel on the Servo Expansion, and a Servo class that uses OmegaPwm to control a servo connected to the Servo Expansion. Our main program will be making use of the Servo class! So here what the full code looks like:
Since we installed mosquitto, the Omega is running an MQTT server. Using the local MQTT server, we can use a pub-sub model (publish and subscribe) to create applications that involve several components and moving parts.
Now, it’s time to write the main program that will connect to the local MQTT server, subscribe to a topic, and react to messages received from the topic. Please take a look at the code below:
Let’s get a closer look at the code.
- We are instantiating objects for the MQTT server and the Servo Motor.
- Defining the callbacks for MQTT events:
on_connect– will execute when a connection to an MQTT server is established. After we’re connected, we’ll want to subscribe to our topic of intereston_subscribe– will execute when a topic subscription is successful, in our case it will print out that the subscription was successfulon_message– will execute whenever a message is published on a topic to which we are subscribed.- This is where we’ll use the payload received from the message on the topic to set the angle of our servo. First we’ll convert the payload to an
intand then use it with thesetAnglefunction to set the position of the servo motor to its corresponding value
- This is where we’ll use the payload received from the message on the topic to set the angle of our servo. First we’ll convert the payload to an
on_disconnect– will execute when the program disconnects from the MQTT server.
After all the definitions are done, we can go ahead and assign the callback functions to the corresponding events in our mqtt object:
 mqttc.on_message = on_message
 mqttc.on_connect = on_connect
 mqttc.on_subscribe = on_subscribe
 mqttc.on_disconnect = on_disconnect
Afterwards, we connect to the Omega’s MQTT server and start the infinite network loop to ensure the program runs and the event callbacks get triggered when MQTT events occur:
mqttc.connect('127.0.0.1')
mqttc.loop_forever()
The last step is to ensure the readings from the microcontroller on UART1 will be continuously published to a topic on our MQTT server. This is accomplished in the bash script named startMqtt_runMain.sh
We’ll pipe everything received on UART1 to the mosquitto_pub command:
cat /dev/ttyS1 | mosquitto_pub -t servoControl -l
Where servoControl is the name of the topic to which we will be publishing.
You may notice this command will run in the background, this is because we added an & at the end.
And you are all set now! It’s time to go ahead and start publishing the microcontroller data to our MQTT server and then control the servo motor using the potentiometer. For that, just issue the following command:
sh startMqtt_runMain.sh
When you rotate the potentiometer the you will see that the servomotor reacts almost instantly! So, let’s cover what we’ve learned this week:
- Continuously read the potentiometer input and convert it to an angle recognizable by the servo motor
- Communicating the results continuously to the Omega via Serial communication (UART)
- Setup the an MQTT server and publish data to a topic
- Writing a Python script to subscribe to an an MQTT topic and control the servo motor using the messages
Now it’s your turn to use this and make some creative projects that will benefit your daily routine!