First Time Setup
This guide will help you set up your Omega2 Dash for the first time. We’ll cover:
- Powering up the Omega2 Dash
- Using the Setup Wizard to have it connect to your WiFi network and update the software
If you experience issues at any point in the process, try checking our Troubleshooting guide, or our guide on First Time Setup using the Command Line.
Unboxing and Getting the Hardware Ready
Unpack
Unpack the Omega2 Dash

Provide Power
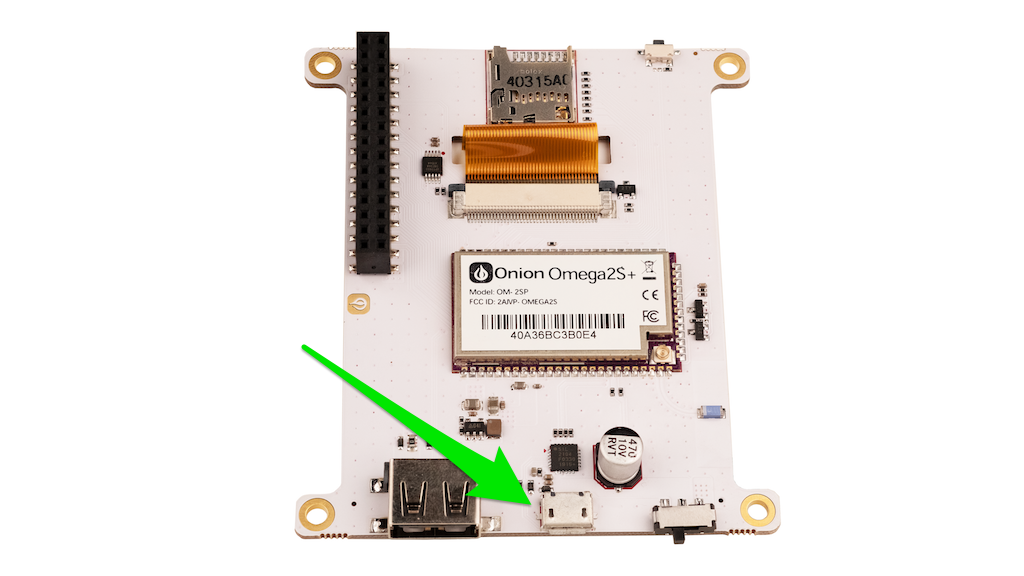
Provide power to the Omega2 Dash through the MicroUSB port.
Power On!
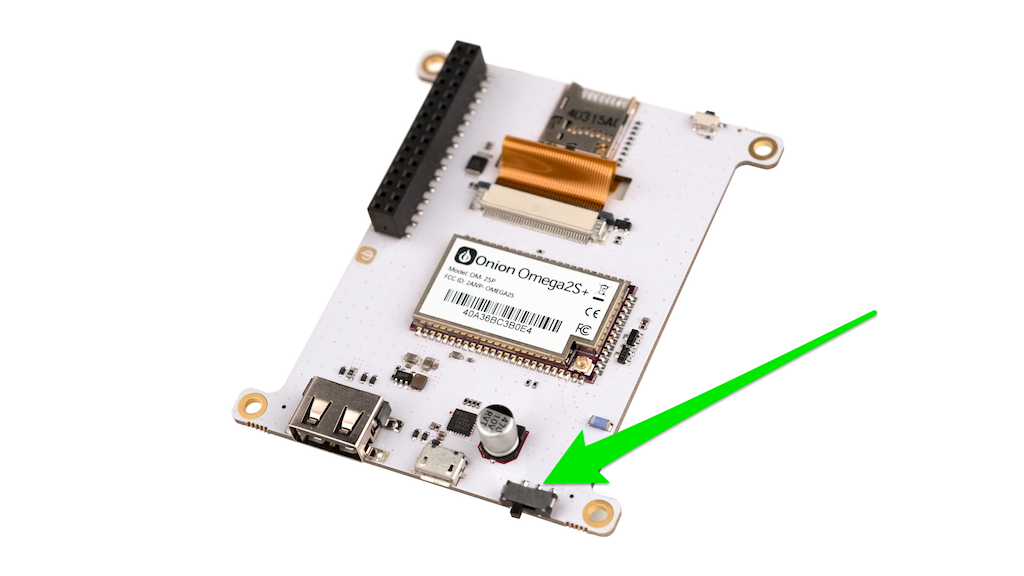
Turn on the Omega2 Dash using the switch.
Wait till it boots
The amber Omega status LED beside the Onion logo on the side with the TFT display should turn on and then start blinking after about 10 seconds. In about a minute, the LED will stop blinking and remain solid, this means that the Omega has completed its boot sequence!
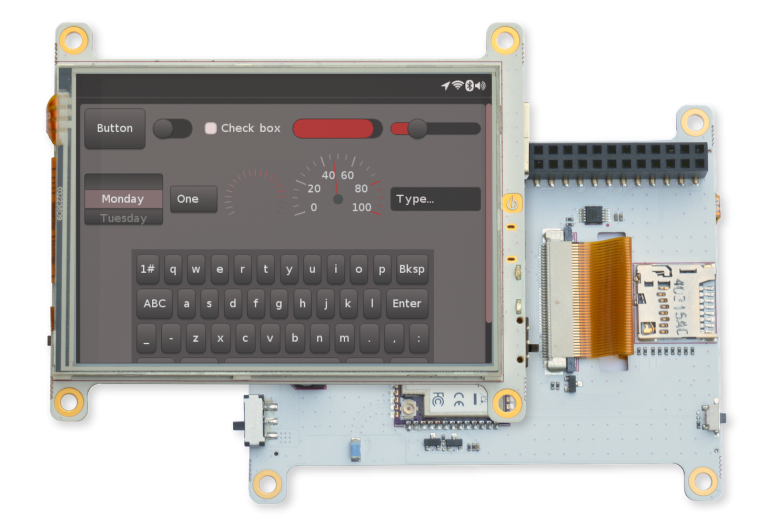
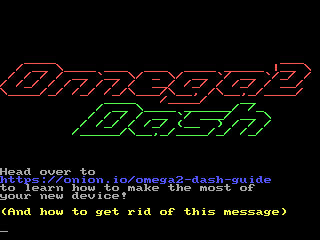
The display will then show a welcome message:
Using the Setup Wizard
Some Computer Configuration
Your computer may need some additional programs to access the Omega through a browser:
- If you are using Windows, install Apple’s Bonjour Service
- If you are using Mac OS X, you’re all set to go
- If you are using Linux, the Zeroconf services should already be installed and you will be good to go
The Omega’s Name
Let’s find your Omega’s name before going any further.
There’s a sticker on the shielding of the Omega2S module on the Omega2 Dash
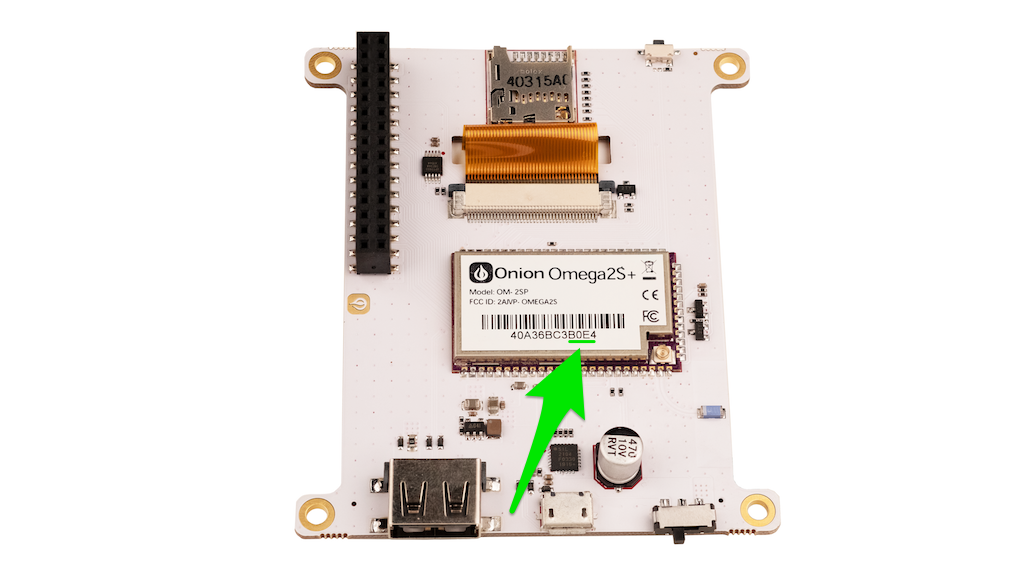
The text printed below the bar code is the Omega2 Dash’s unique MAC address, we’re interested in the last four digits. Your Omega’s name is Omega-XXXX where XXXX are the last four digits from the sticker.
So the Omega from the picture above is named Omega-B0E4
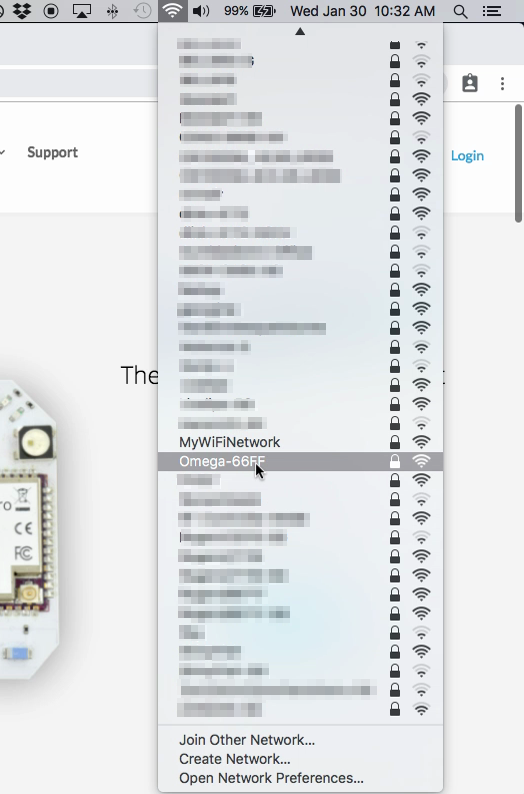
Connect to the Omega’s WiFi Network
The Omega hosts it’s own WiFi network access point. Lets connect your computer to it. The WiFi network is named the same as your Omega and the default password is 12345678
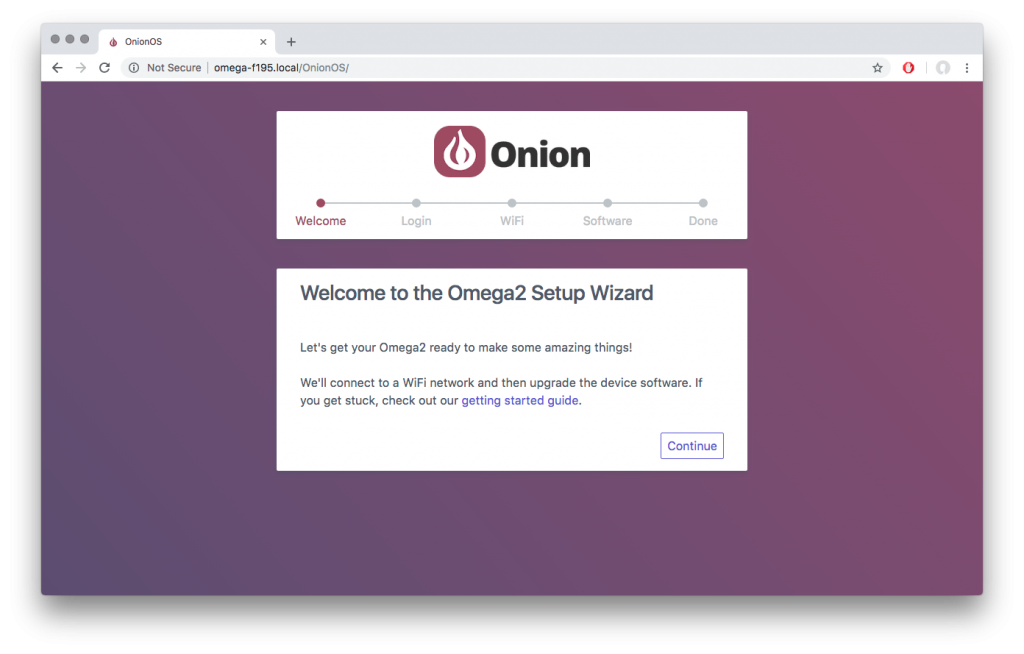
The Setup Wizard
Open your favourite browser and navigate to http://omega-XXXX.local/ where XXXX are the same characters from the network name above. If the page doesn’t load, you can also browse to http://192.168.3.1
You have now arrived at the Setup Wizard, hit Continue to get started:
Login with the Omega’s default credentials:
username: root
password: onioneer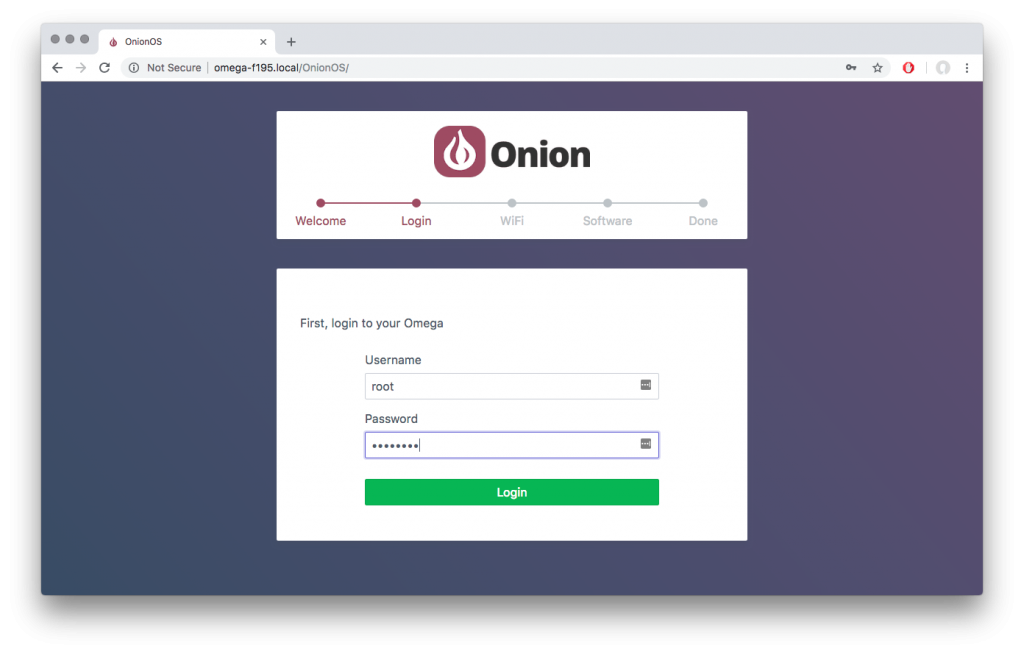
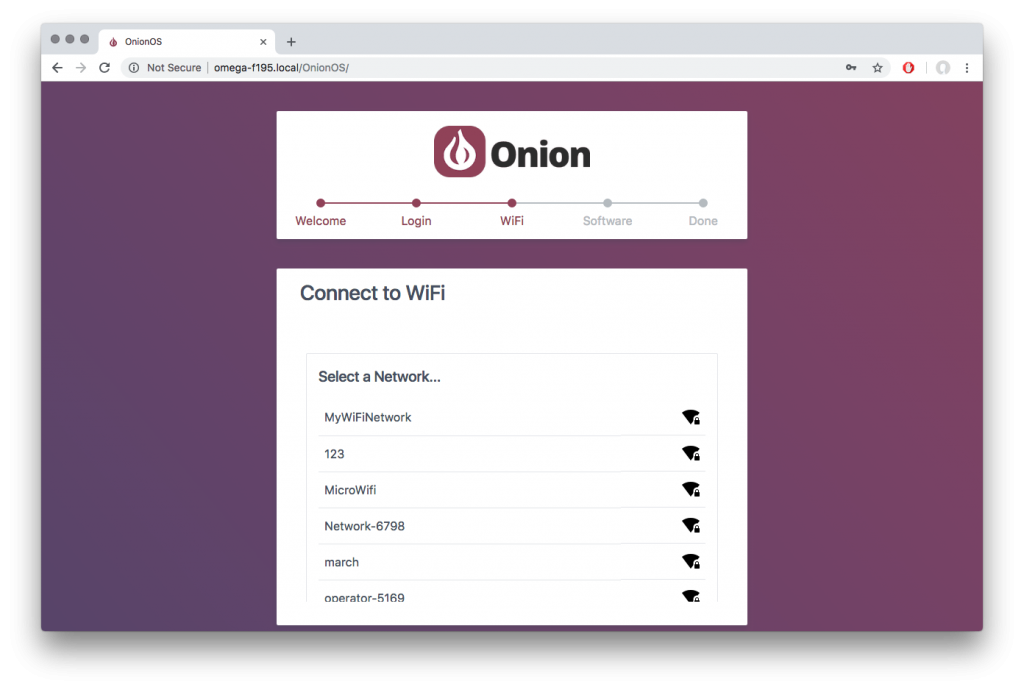
Connect to WiFi
After you’ve logged in, the Omega will scan the environment for available networks and will show the results in a list. In our case, we want to connect to the WiFi network (creatively) named MyWiFiNetwork, so we’ll go ahead and click on it:
This will open a prompt to enter the network password, if the network requires a password:
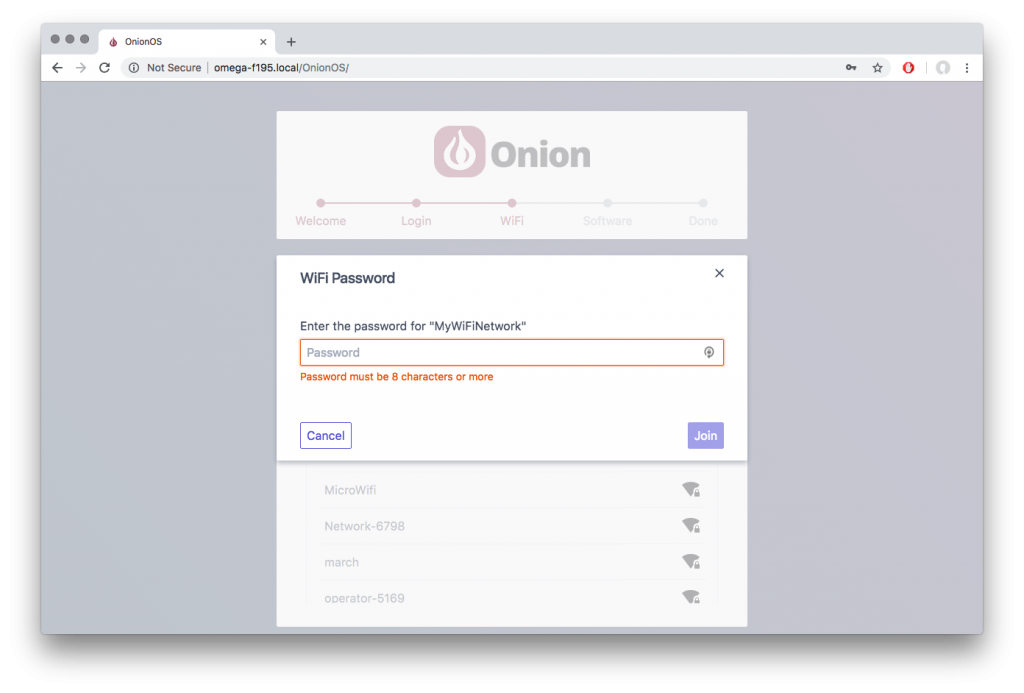
Notice how you’ll only be able to click Join when the password length requirements have been met:
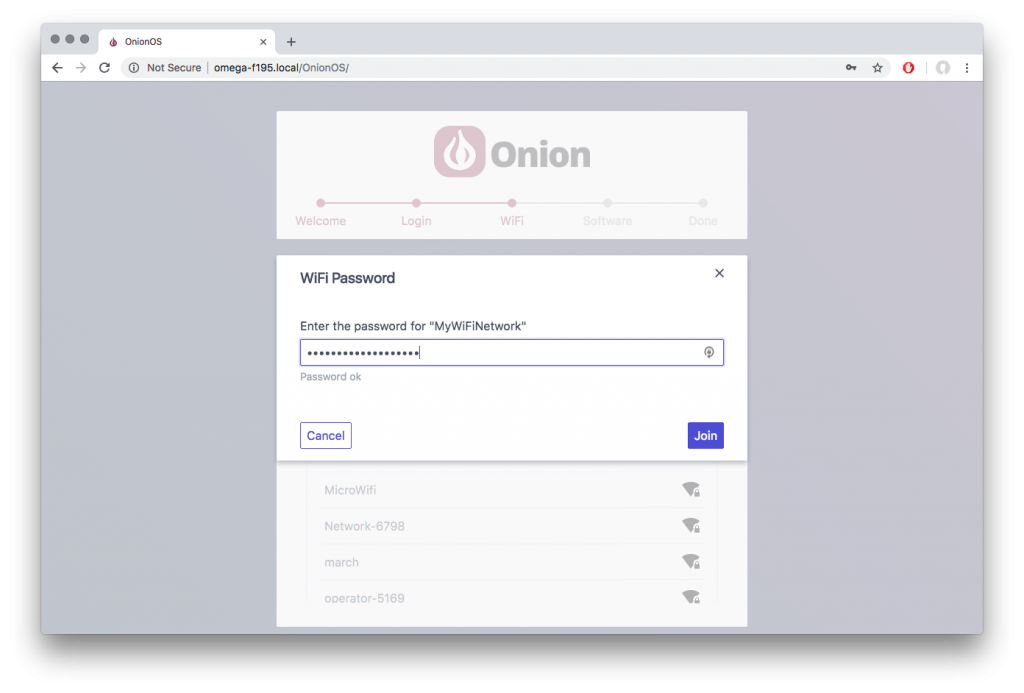
Once you click Join, your Omega will attempt to join the network. This might take up to a minute.
It’s possible that your computer will disconnect from the Omega’s WiFi Access Point, make sure to reconnect if that happens!
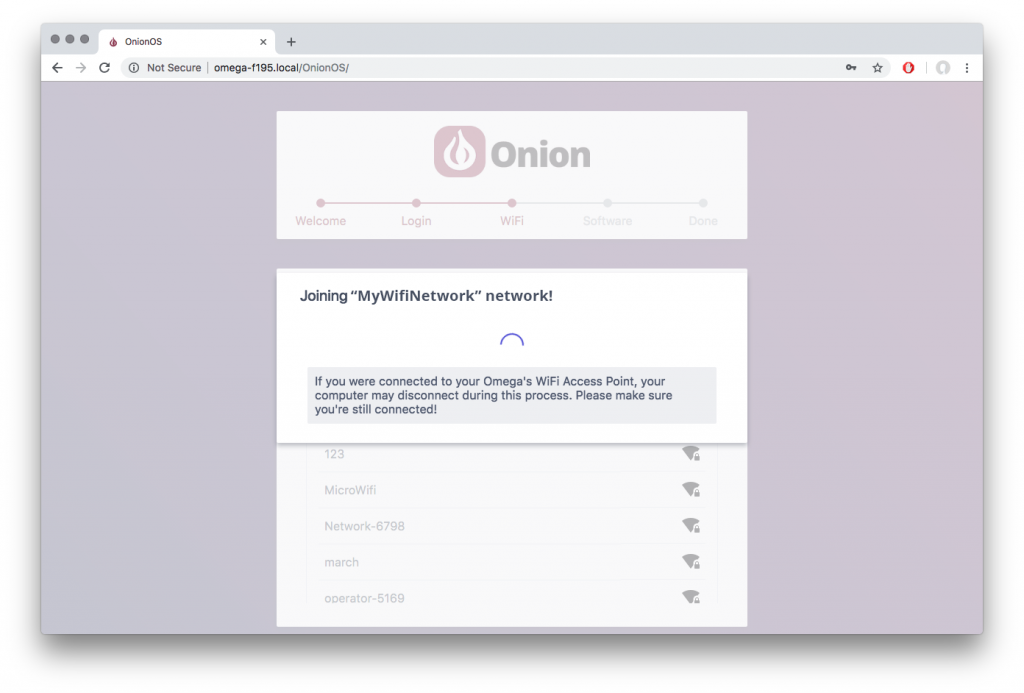
When to Omega starts connecting, the Blue WiFi LED on the Omega2 Dash will start to blink.
When the connection is successful, the LED will turn solid, and the setup wizard will let you know the connection is successful before moving on to the next step.
Software Updates
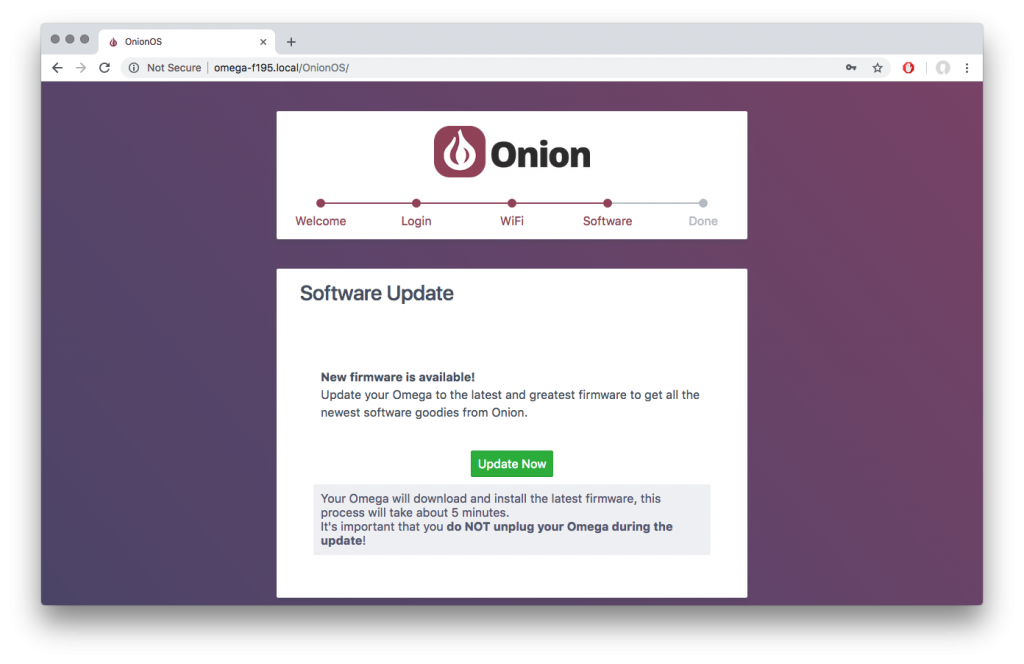
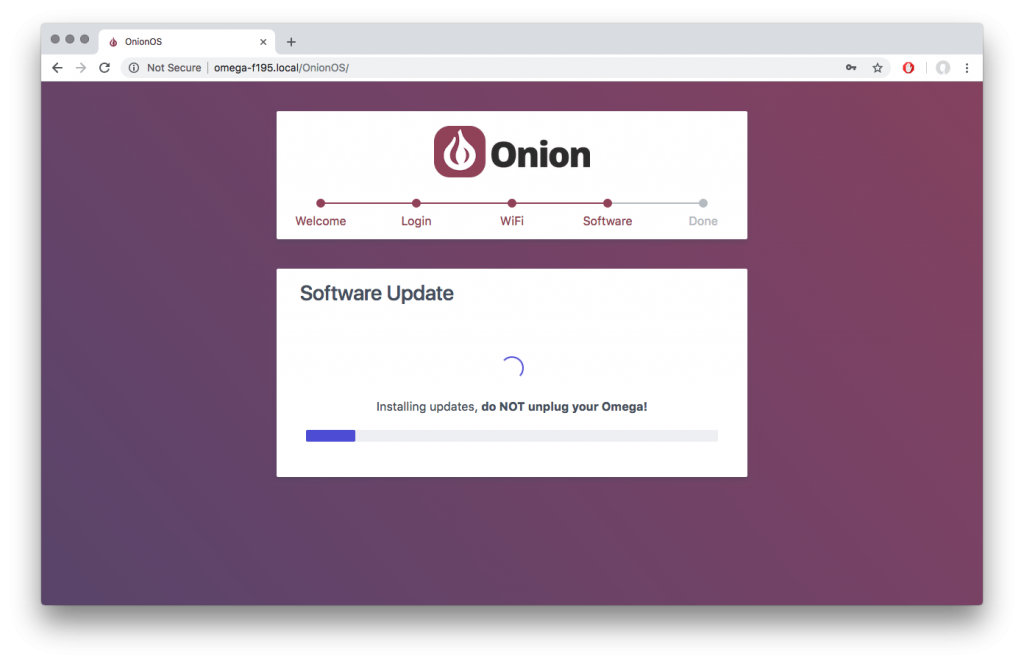
Last step! Now that your Omega is connected to the internet, it will check if software updates are required.
If updates are available, you’ll be able to update by clicking the Update Now button.
Something really important to remember about the update process: it’s absolutely critical that you keep your Omega plugged in and powered on during the update process. The whole process will last about 5 minutes and then you’ll be ready to start making awesome things with your Omega:
Your Omega will download the updates and install them. The amber LED on your Omega will be blinking at this point.
Finally, your Omega will reboot and initialize the new software. You’ll know everything is done when the amber status LED on your Omega stops blinking and remains on.
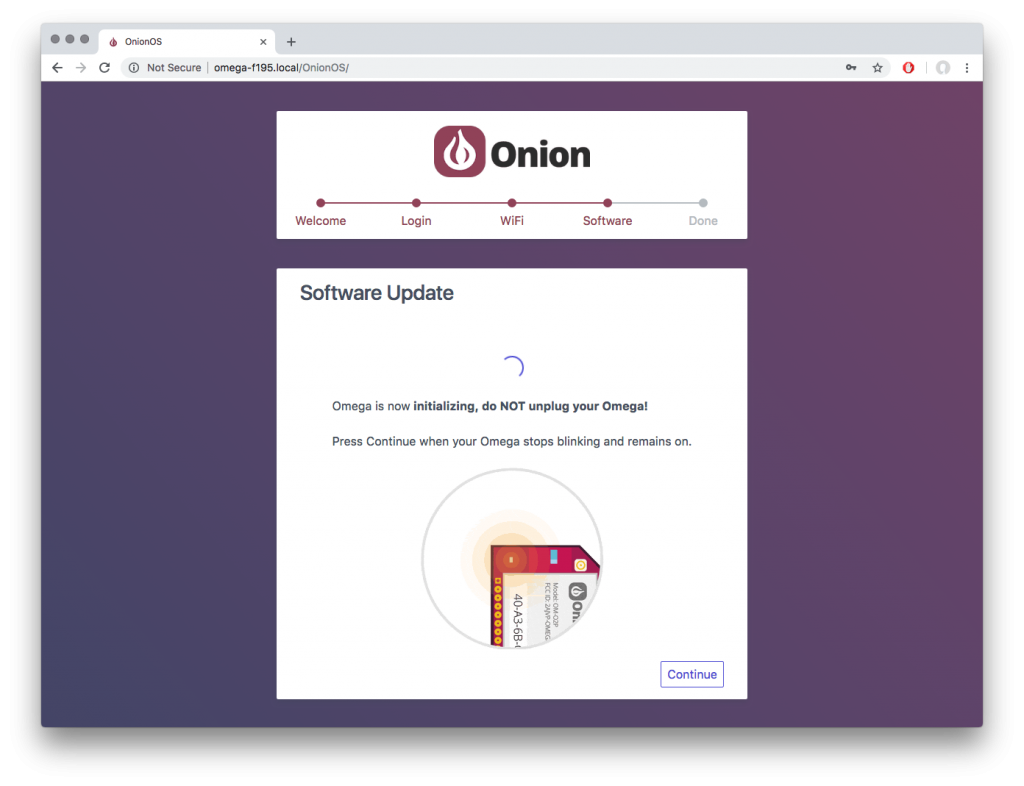
When that happens, press Continue. That brings us to the end of the Setup Wizard, your Omega is now configured and ready to go!
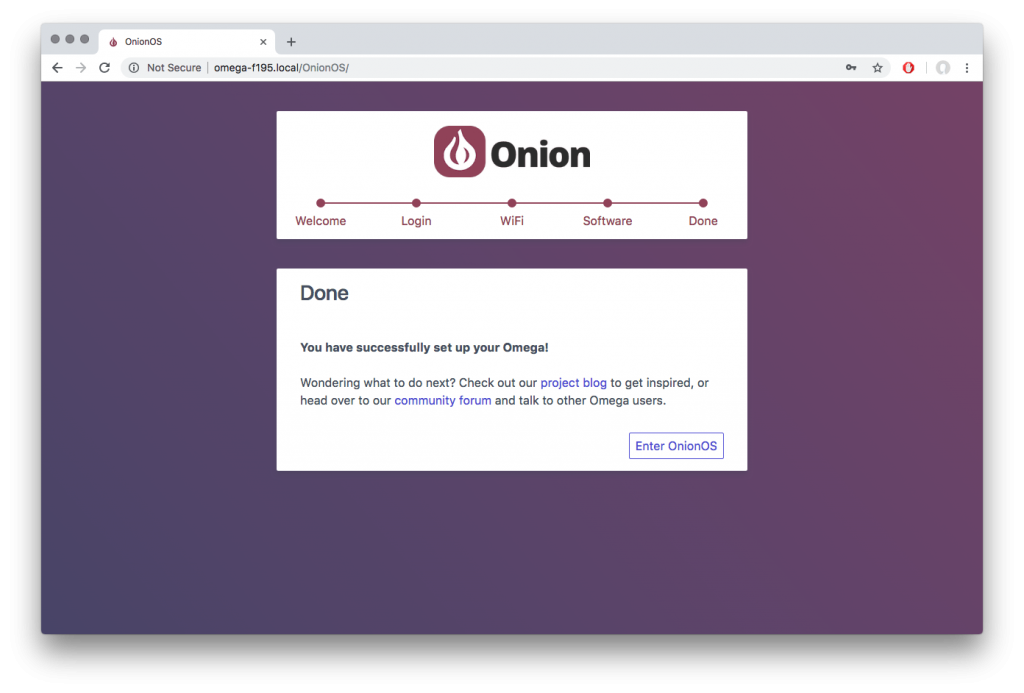
From now on, when you point your browser to your Omega, you’ll be taken directly to OnionOS.
The Setup Wizard Didn’t Work for me!
If for some reason the Setup Wizard wasn’t able to get your Omega up and running, try the steps in the First Time Setup using the Command Line guide or see the Troubleshooting guide.
What’s next? Where can I get more information?
Next you’ll most likely want to connect to the Omega’s command line. Beyond that, you can check out our extensive documentation on using the Omega.
If you’re interested in the web-based OnionOS virtual desktop, check out the OnionOS getting started guide.
Using the Omega2 Dash
Here we’ll cover some of the awesome things you can do with the Omega2 Dash.
Removing or Changing the Boot Message
By default, the Omega2 Dash is configured to show this “splash screen” when it boots:
The /etc/rc.local script mechanism is used to draw this splash screen right when your device finishes booting.
Read more about running commands automatically at boot in our documentation.
Removing the Boot Message
Open the /etc/rc.local script file and you’ll see something like the following:
# Put your custom commands here that should be executed once
# the system init finished. By default this file runs the
# Omega2 Dash initialization script.

# disable the blinking cursor
echo 0 > /sys/class/graphics/fbcon/cursor_blink

# display the splash screen text
/usr/bin/o2-dash-init > /dev/tty1

exit 0
This line is the one that writes the spash screen to the display:
/usr/bin/o2-dash-init > /dev/tty1
To stop the boot message from being displayed every time your Omega2 Dash boots, comment out the line by adding # to the beginning:
#/usr/bin/o2-dash-init > /dev/tty1
Save your changes and exit. Next time you turn on the Omega2 Dash, there will be no boot message.
Btw, you’ll notice how we also disable the blinking cursor. You can comment out that line as well if you want to keep it enabled.
Changing the Boot Message
Instead of completely removing the boot message, you can change it to whatever you like.
Breaking down the command from above:
/usr/bin/o2-dash-init > /dev/tty1
You’ll see that the output of the /usr/bin/o2-dash-init script gets written to the Omega2 Dash’s display device, /dev/tty1 (more on that below). If you open /usr/bin/o2-dash-init, you’ll find that it’s a shell script like any other.
Change the text output of the o2-dash-init script, and you’ll change your boot message. Simple!
Keep reading to learn about more about writing text or drawing images on the display
Writing Text on the Display
By default, the framebuffer is connected to the /dev/tty1 virtual device.
So, whatever is sent to /dev/tty1 will be displayed on the screen.
Try it out:
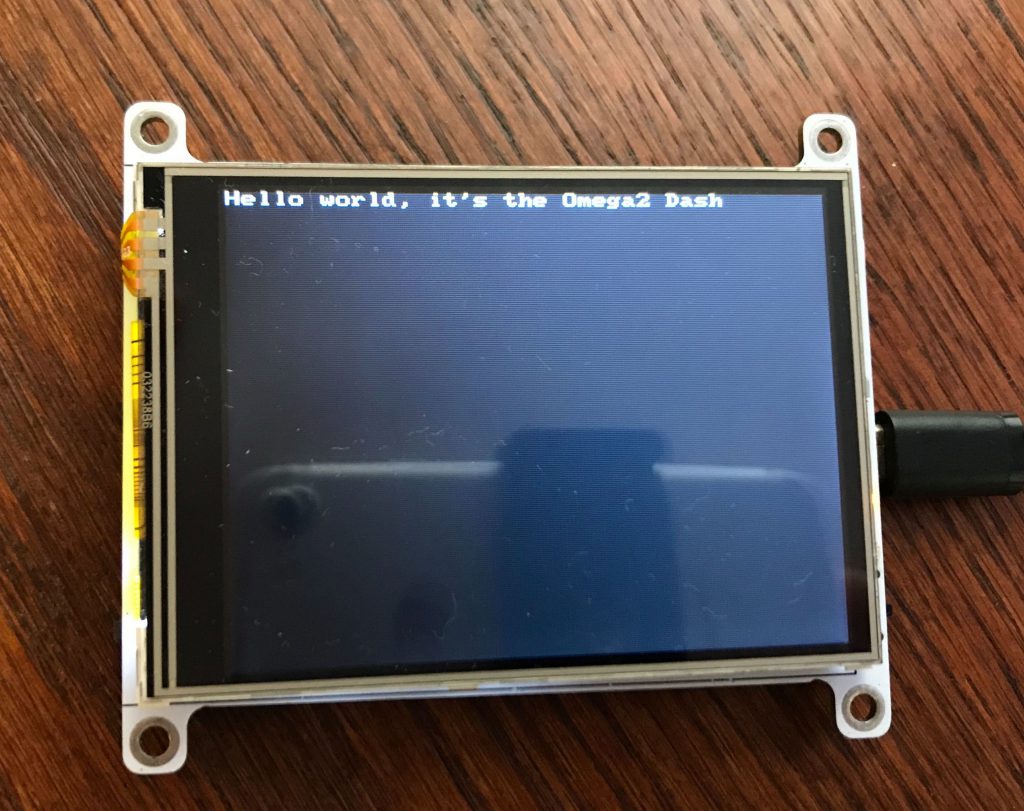
echo "Hello world, it's the Omega2 Dash" > /dev/tty1
To clear the screen:
clear > /dev/tty1
But that’s not all, using ANSI escape characters we can add color!
echo -e "\033[94mWow\033[0m! So \033[92mmuch\033[0m \033[91mroom\033[0m for \033[4mactivities\033[0m" > /dev/tty1
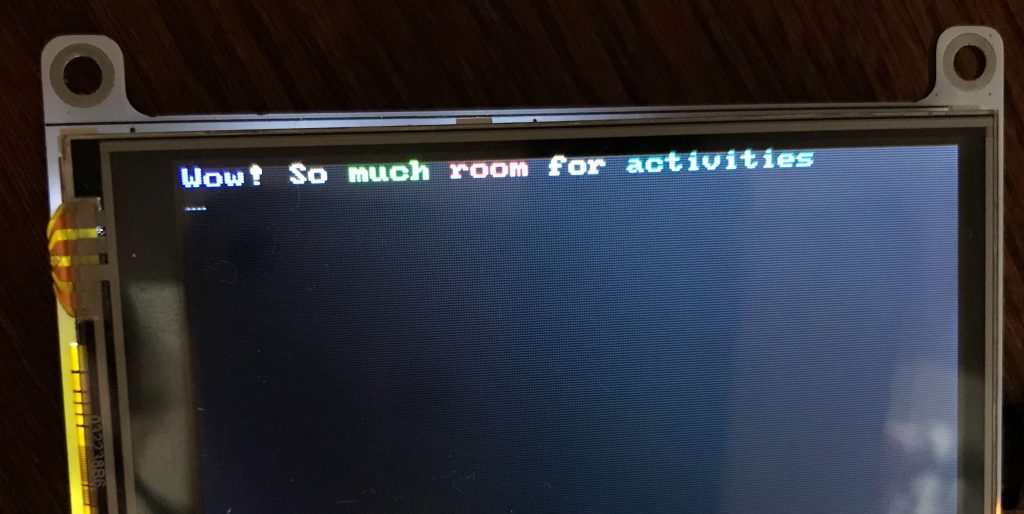
Looking at the command it might seem confusing but it’s straightforward.
Take \033[94mWow\033[0m,
\033acts as an escape character[94msets the color to bright blueWowis the text\033[0mresets the text to default.
Learn more about ANSI escape characters here and here, and see this list of color codes.
Taking this one step further, we can incorporate ANSI escape characters in our scripts and programs.
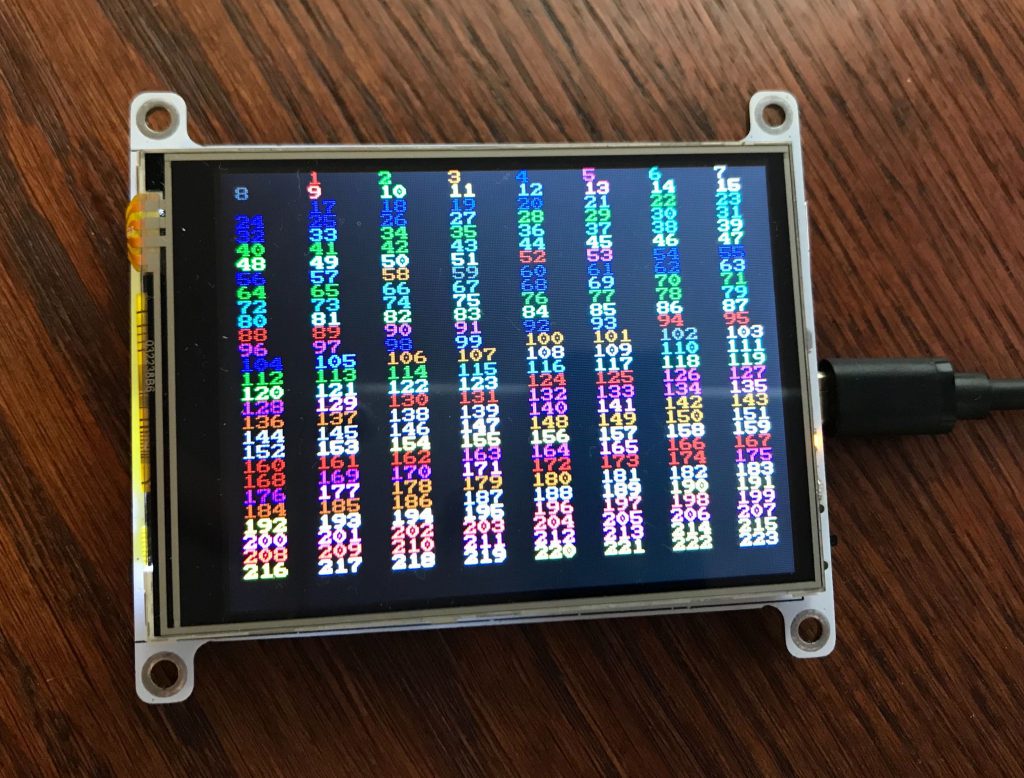
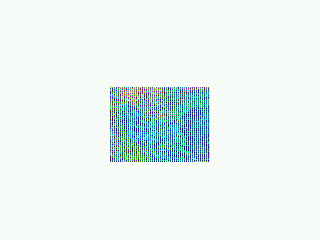
For example, check out this Python program that loops through the available colors:
import sys
for i in range(0, 14):
    for j in range(0, 16):
        code = str(i * 16 + j)
        sys.stdout.write(u"\033[38;5;" + code + "m " + code.ljust(4))
    print(u"\033[0m")
Run it on your Omega2 Dash and pipe the output to /dev/tty1:
python3 color.py > /dev/tty1
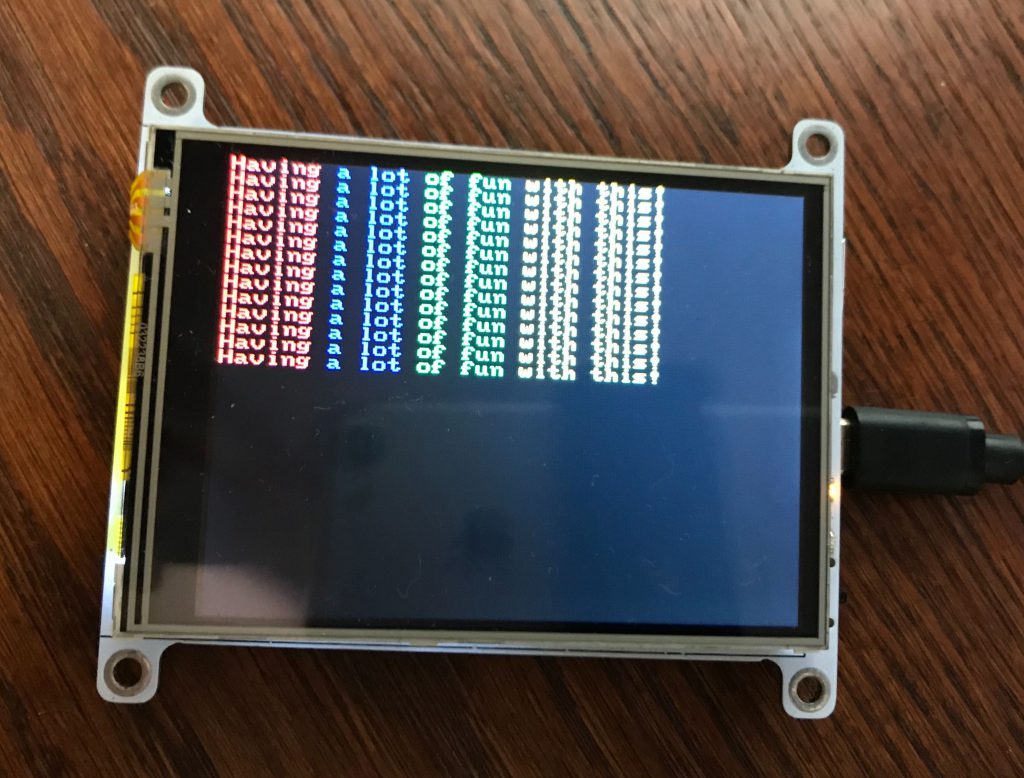
We’ve also put together a little Python script that makes it easy to color your text.
python3 colorMessage.py > /dev/tty1
Source code available on GitHub.
LVGL Quickstart Template
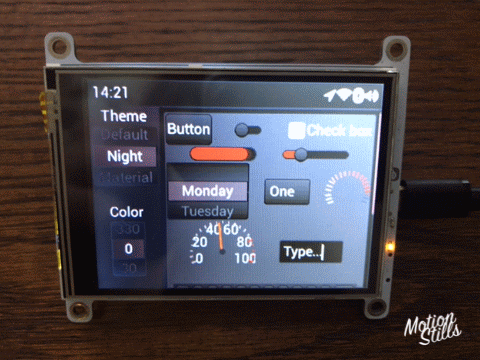
To make GUI development for the Omega2 Dash quick and easy, we’ve designed the Omega2 Dash to be compatible with the LittleV Graphics Library. LittlevGL (lvgl) is a free and open-source graphics library for C and C++that has everything you need to create an embedded GUI with easy-to-use graphical elements and visual effects. Take a look at the LittleVGL website to get an idea of the available graphical elements and themes.
To get started quickly with building your own UI for the Omega2 Dash, we’re sharing our lvgl quickstart template for C! It’s a pre-configured lvgl C project that supports drawing to the Omega2 Dash display and reading touch input. It also includes a makefile and instructions to build it as an OpenWRT Linux package.
You can use this template as a time-saving starting point for building your own UI for the Omega2 Dash!
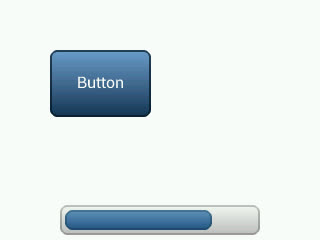
We’ve added ~10 lines of demo code that draws a button and executes a callback whenever it’s pressed. Start there and build your own amazing UI.

The Omega2 Dash lvgl template, named lv_example, can be found on on GitHub, along with instructions on how to test drive it on your own Omega2 Dash.
Micropython & LVGL
So that it’s super easy to get started creating GUIs, we’ve worked to make Micropython with built-in LVGL support available for the Omega2 Dash!
This is a great way to quickly prototype and build your GUI. Since Micropython is an interpreted language, code changes and design iterations are very quick since it just consists of changing the code and running the program. (As opposed to the process with C: changing the code, compiling, transferring to the device and then running)
On top of that, you take advantage of Micropython being easier to read and write than C and the fact that it’s a high level programming language – opening the door to object oriented programming and interaction with the web.

Installing LVGL Micropython
Make sure your Omega2 Dash is connected to the internet, then run:
opkg update
opkg install lv_micropython
And that’s it!
Running LVGL Micropython
The Micropython REPL can be useful for running commands interactively. Activate it by just running:
micropythonYou’ll need to press Ctrl+d to exit.
But you’ll likely want to run your own scripts. After all that’s the most fun! Run micropython and pass the path your script as an argument:
micropython <PATH TO SCRIPT>
Sample Code
To get up and running quickly, you can try running the example lvgl+micropython scripts we have on GitHub.
First, try fbtouchtest.py to test out basic animations and pressing a button. We’ll download the script to the /root directory and then run it:
wget https://github.com/OnionIoT/lv_micropython/raw/master/examples/onion/fbtouchtest.py -O /root/fbtouchtest.py
micropython /root/fbtouchtest.py
Try pressing the button that shows up!
Next, we’ll try the fbdragtest.py example where you can use the touch input to drag an image around.
Same as before, we’ll download it to the /root directory and then run it:
wget https://github.com/OnionIoT/lv_micropython/raw/master/examples/onion/fbdragtest.py -O /root/fbdragtest.py
micropython /root/fbdragtest.py
Try using your finger to drag the little box!
GPIOs & Expansion Header
The Omega2 Dash features a 30-pin Expansion Header that gives you easy access to the GPIOs, and allows you to connect Omega2 Expansions directly.

To learn more about using the GPIOs, electrical ratings, and pin multiplexing, see our GPIO documentation article.
The Omega2 Dash is compatible with the existing ecosystem of plug-and-play Omega2 expansions.
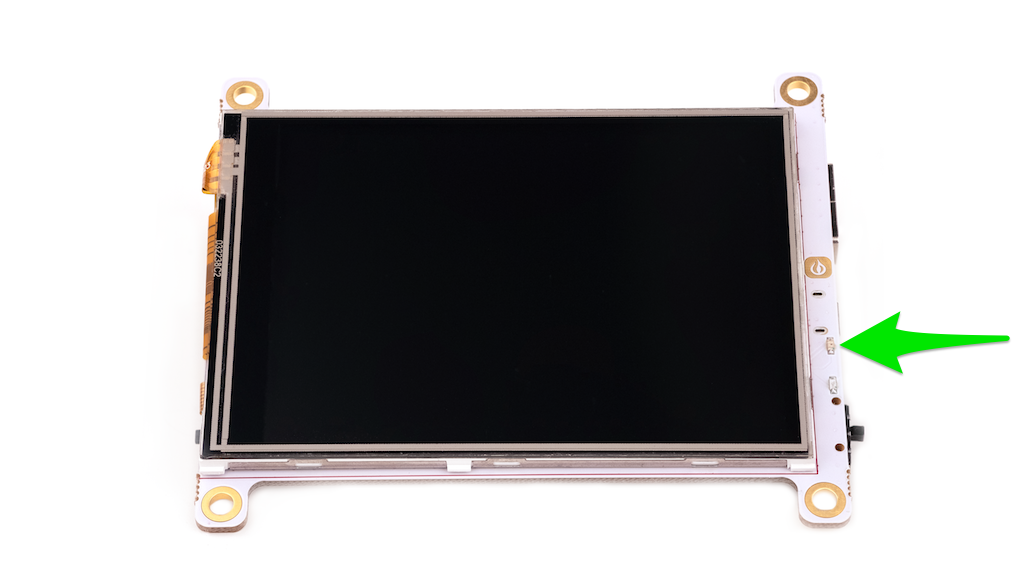
The Status LEDs
The Omega2 Dash features two LEDs to provide visual feedback on the current status of the device:
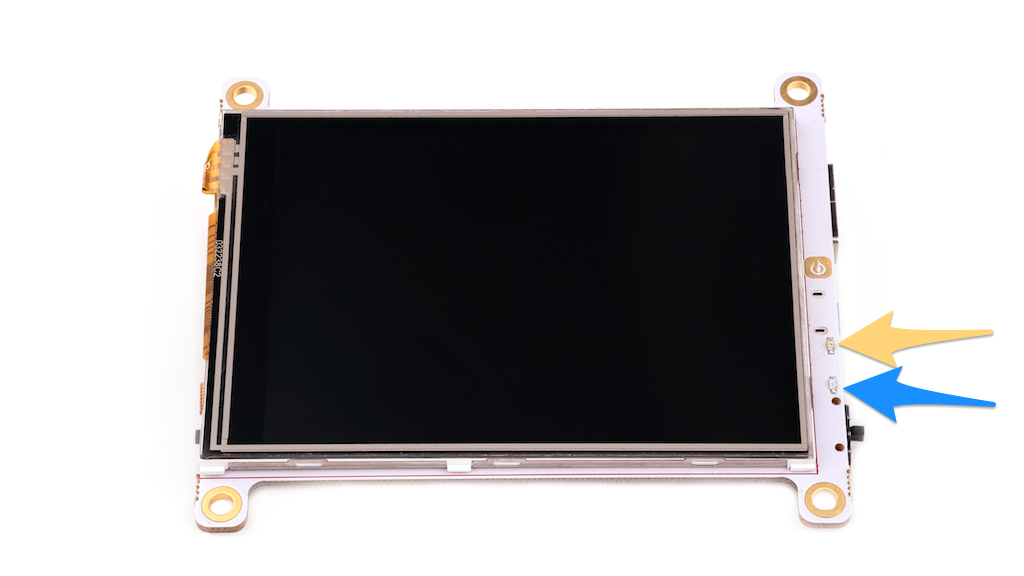
| Status LED | Indicates |
|---|---|
| Amber System status LED | Whether Linux OS has booted |
| Blue Wi-Fi status LED | Connection to a Wi-Fi network is active |
And what the behaviour of the LEDs indicates:
- System status LED
- Off – Device not powered on
- Blinking – Booting/updating
- On – Up and running
- WiFi status LED
- Off – Not connected to WiFi network
- Blinking – Connecting
- On – Connected