The second part of this week’s 2-Bullet Tuesday! See the first part here.
You can subscribe to the newsletter on the 2-Bullet Tuesday page!
Omega Tip of the Week:
Working with Remote git Repos
Last week we covered the basics of git. This week we’ll show you how to work with repositories hosted online, as well as making your own. This is another way to wirelessly transfer code and files to the Omega!
The basic steps of making changes, adding them to staging, and committing are the same, with two more steps: pulling (downloading the latest changes) and pushing (uploading your changes to the Internet). Read on and get rolling!
Installing git-http
Run the following commands to set up the programs needed to download and upload git repositories to the Internet:
opkg update
opkg install git git-http ca-bundle
Cloning
Cloning is downloading a repository from the Internet and setting it up as a local repository so that you can continue to add and track changes (stored in .git).
First, let’s clone one of Onion’s public sample repos. Run the following:
cd ~
git clone https://github.com/OnionIoT/oledQrCodeGenerator.git
The code will be downloaded into a directory with the same name as the repo, oledQrCodeGenerator. If you want to clone into a different directory or one that already exists, simply add a directory name after the repository URL to the git clone command.
You can cd into the directory and see all of the downloaded files:
root@Omega-3D2B:~# cd oledQrCodeGenerator/
root@Omega-3D2B:~/oledQrCodeGenerator# ls
LICENSE.md    __init__.py   oledImage.py  qrcode
README.md     main.py       qr-code.lcd
To run the project, follow the instructions in the included README file!
Creating Your Own Remote Repo
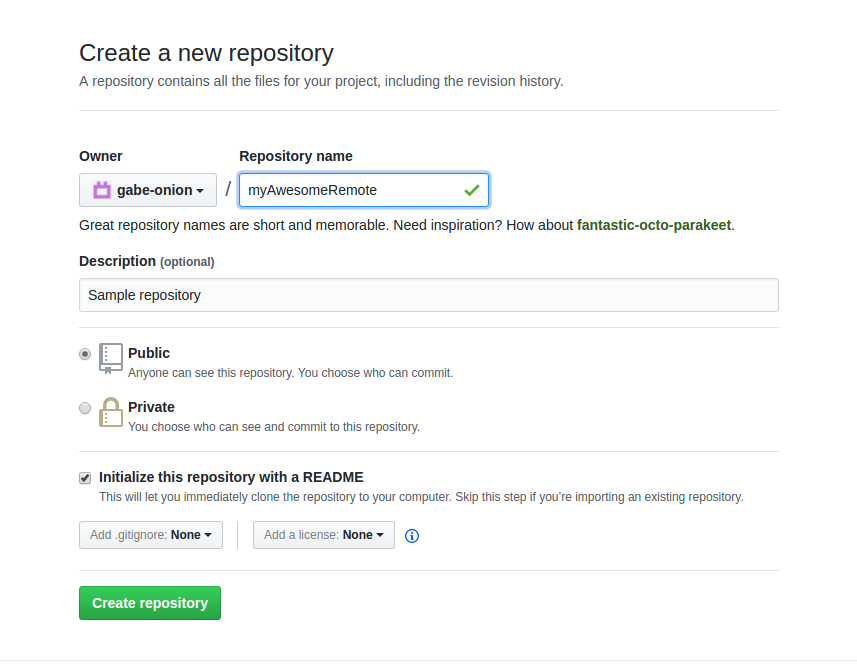
There are many websites that offer free remote hosting, and GitHub is the largest among them. They offer free public repository hosting, meaning that anyone can see and download your repos (Private repos where you control who has access are available on a paid basis.)
To create a remote repository on GitHub, sign up on their website at GitHub.com. Then create a new repo from the home page by clicking on “Start a project”:
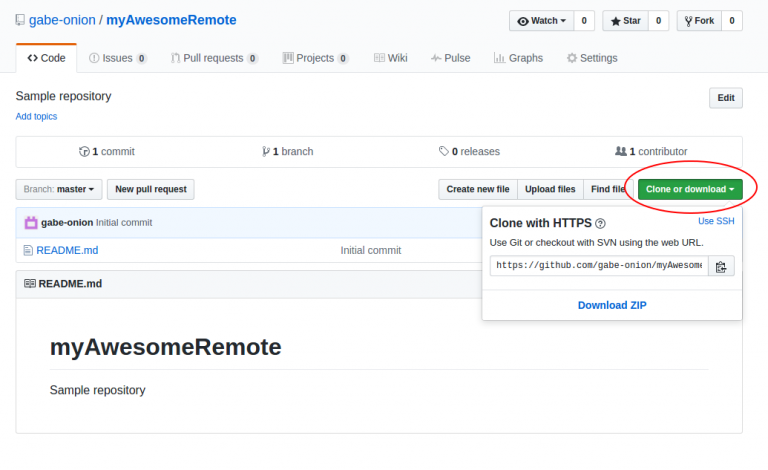
Congratulations, you’ve created your first remote repo! Once you’ve landed at the repo’s web page, let’s get it onto your Omega. Click on the green “Clone or download” button in the top right:

Make sure it says “Clone with HTTPS”, as we haven’t set up your Omega to connect to GitHub using SSH. Then copy the URL and paste it into this command:
cd ~
git clone (REPO URL)
Pushing Changes
You’ve now downloaded the repo and its contents to the Omega. Now before we make any changes, let’s configure our git account details with which to label our commits. Run:
git config --global --edit
You’ll be taken to an editing screen. Uncomment and change the name and email to match your GitHub account (the name field isn’t super important, but the email must match!):
# This is Git's per-user configuration file.
[user]
# Please adapt and uncomment the following lines:
        name = yourNameHere
        email = yourGitHubEmailHere
Let’s make some changes and commit them locally first. Run the following commands and substitute your repo name and GitHub login credentials. Anything beginning with # is terminal output and not a command:
cd (REPO DIRECTORY)
echo "Some like dogs, some like cats, but I'm more of a bird person!" > hello.txt
git add .
git commit -m "informed the world of my preference in pets"
# [master eb65028] informed the world of my preference in pets
# 1 file changed, 1 insertion(+)
# create mode 100644 hello.txt
Now let’s push them to the remote:
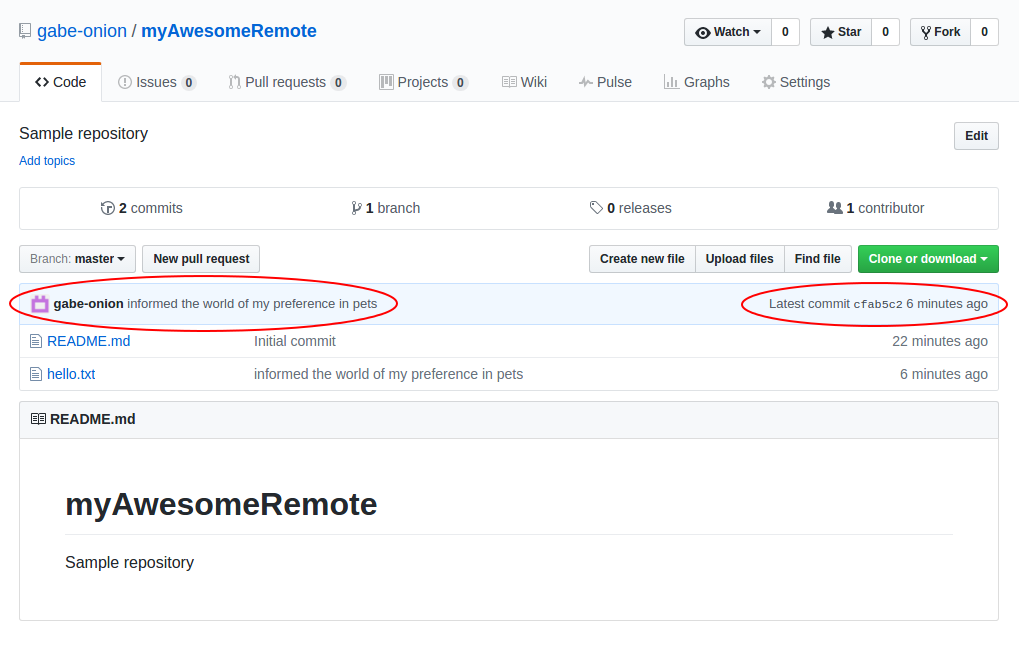
git push # Username for 'https://github.com': (enter your GitHub username) # Password for 'https://GITHUBUSERNAME@github.com': (enter your GitHub password; it will be invisible, so type carefully!) # Counting objects: 3, done. # Compressing objects: 100% (3/3), done. # Writing objects: 100% (3/3), 352 bytes | 0 bytes/s, done. # Total 3 (delta 0), reused 0 (delta 0) # To https://github.com/gabe-onion/ myAwesomeRemote.git # ae9917d..eb65028 master -> master
Now return to your repo’s web page and refresh; you should see your new commit!
Working with remotes is also a way to “back up” your code online in case something goes wrong with your computer or your Omega.
Pulling Changes
When you push changes to a repo, the changes will not automatically be pushed to other computers that downloaded it. On other computers, you will need to manually pull the latest changes from the remote whenever you need to update the software or start new work on the repo. We do this with git pull. It does the following:
- Checks for updates in the repo’s remote branches
- Updates the files in your repo if there are any new changes to the branch you currently have checked out
First, commit any uncommitted changes to your branches. Then git checkout the branch you want to update, like so:
git checkout (BRANCH TO UPDATE)
git pull
In this way, you can develop a project on your computer using an editor or environment with which you’re comfortable. You can then push commits and download them onto the Omega wirelessly!
And that’s it! You now have the tools to quickly develop, keep track of, and share your projects with the world. Check out our article on Installing and Using Git on the Omega for full details.
Let us know what kind of stuff you would like to see featured on 2–Bullet Tuesday! Send a tweet to @OnionIoT with your suggestions!
Thanks for reading! Have a great week!
P.S. — Our Omega2 Indiegogo campaign will be ending in the near future! Don’t miss your chance to get the Omega2 for just $5!
P.P.S — We’re shipping packages on a daily basis! If you haven’t gotten yours yet, sit tight!