
HI EVERYONE!
Welcome to the 52nd edition of 2-Bullet Tuesday! It’s been a whole year since we’ve started sharing useful tips and awesome stuff sent in by Omega2 users all around the world.
Favorite Project
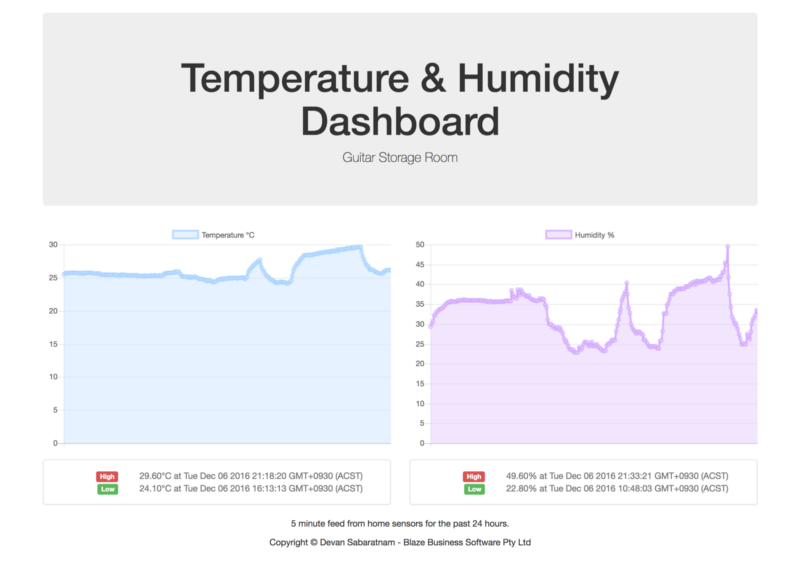
Our favorite project this week is an Omega and Amazon AWS powered IoT dashboard made by Devan Sabaratnam. This project serves as an internet-accessible temperature and humidity monitor for Devan’s guitar room, allowing him to make sure his guitars are doing well even when he’s away for extended periods of time.
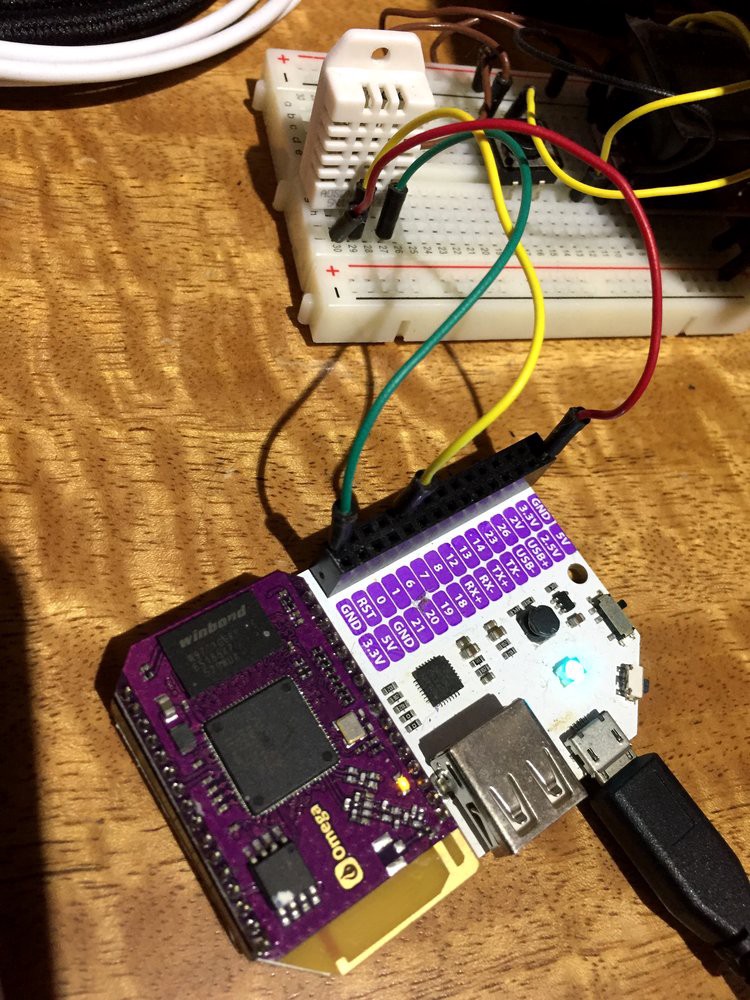
On the hardware side, Devan used an Omega, an Expansion Dock, and a DHT22 sensor. On the software side, Mosquitto MQTT is used to interact with the AWS IoT service and a Node.JS program runs in the background to collect temperature data and publish it to AWS. By adding his Omega as a thing on Amazon’s IoT cloud and piping the incoming data to a database, Devan is able to see the temperature and humidity in his guitar room on a website in almost real time! The site can be accessed anywhere with an internet connection, and Devan can get in touch with his family members to rectify any environmental changes in the guitar room!
His post outlines all of the required steps in detail and can be used as a baseline for your own AWS IoT+Omega projects! While Devan used the classic Omega, everything will work on the Omega2 as well. Thanks for sharing your awesome project in such detail, Devan, you rock!
Omega Tip
In this week’s tip, we’ll learn how to properly use the u.FL socket to connect external antennas to your Omega. If you are not familiar with this connector you might be asking “what is this strange connector next to the WiFi antenna and what’s it for?”. Well, by the end of this tutorial, you will be familiar with this surface-mount connector and will be able use it to extend your Omega’s WiFi range.
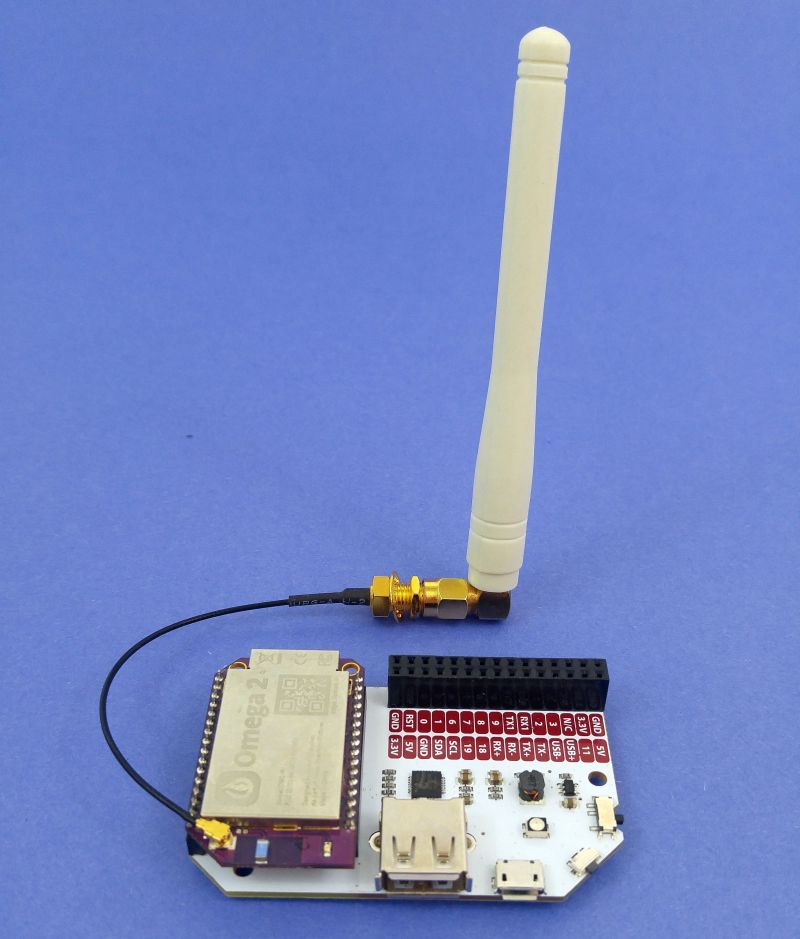
The U.FL connector is a RF coaxial connector that used to connect external antennas for enhanced signal strength. You can connect any RP-SMA antenna with a U.FL pigtail directly to the Omega2. When the antenna is plugged in, both the surface-mounted (SMT) antenna and external antenna share the transmission power coming from the Omega, providing only half of the expected gain. This tip will show you how to physically modify your Omega so that only the external antenna is used and you see the expected performance increases!
Physical Modification
DISCLAIMER: Please perform the following permanent modification to your device very carefully and at your own risk. This procedure is difficult to undo, and will require the permanent use of an external antenna to have any sort of reasonable WiFi connectivity. If you damage your Omega during this procedure, Onion Corporation is not responsible.
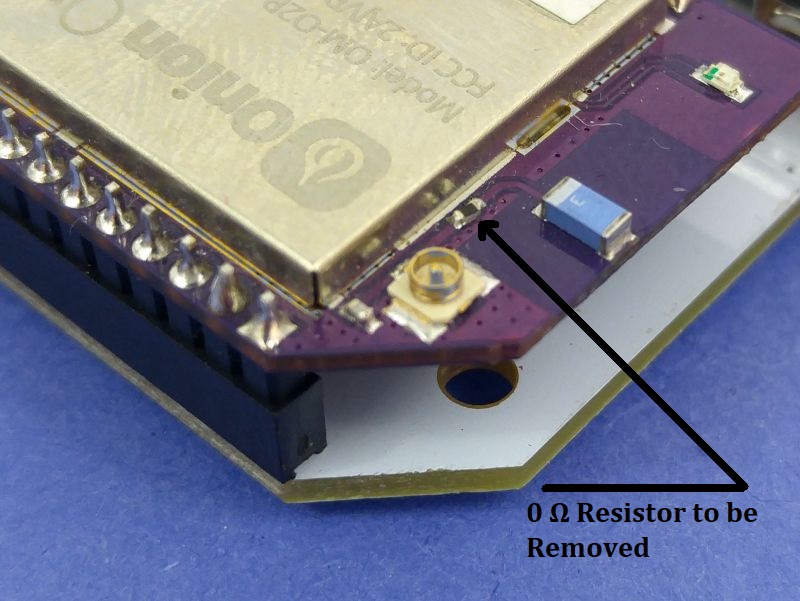
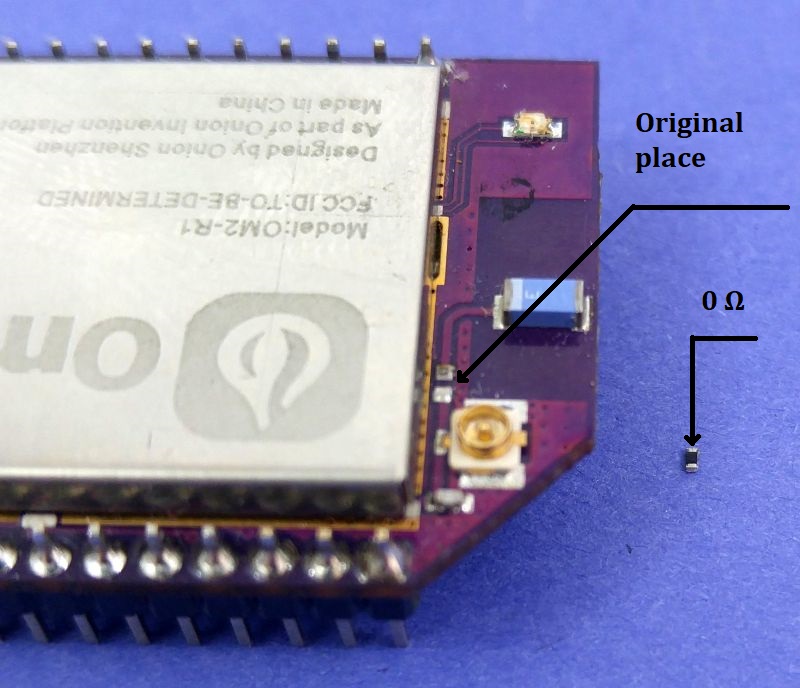
In order to use your external antenna at its maximum performance, the 0 Ω resistor near the the WiFi SMT antenna must be removed. This will disconnect the SMT antenna from the Omega, allowing it to pump all of its transmission power to the antenna connected via u.FL.
So let’s dive in!

We’ll need the following tools:
- Soldering iron
- Tweezers
- Optional:
- Solder Helping Hand
- Magnifying Glass
- Desoldering Pump
Resistor Removal
You’ll notice the 0Ω resistor is on the trace that connects the Omega’s internals to the SMT antenna. We’ll remove this resistor to break the circuit and completely disconnect the SMT antenna.
- Prepare your tools (pre-heat your soldering iron and prepare tweezers)
- Locate your Omega2 with the top side facing upwards and secure it with Solder Helping Hands
- Touch the resistor’s side with the iron’s tip until the solder on the resistor has melted
- Use tweezers to remove the surface mount resistor and discard it
The SMT antenna is no longer used by the Omega.
Connecting the external antenna to the u.fl connector
Now you are almost there! Plug the U.FL antenna to the U.FL connector and power up your Omega2. Wait till it boots and let’s check out the performance! Connect to your Omega from your smartphone/computer and let’s use an app to check the signal strength. For our lab tests we have used an Android app called WiFi Signal Strength Meter made by Phuongpn. It’s a free Android app that shows the most recent wifi signal performance (Signal strength (-dbm), Signal Speed (Mbps), Frequency (MHz) and etc.).
So, connect to your Omega’s AP and start the app. For instance, when we tested the signal in our lab, we got the following results:
| Omega | Signal Strength @ 0 m | Signal Strength @ 5 m | Signal Strength @ 10 m |
| Omega2 w/ SMT Antenna | -61 to -65 (-dBm) | -64 to -67 (-dBm) | -81 to -83 (-dBm) |
| Omega2 w/ External Antenna | -51 to -54 (-dBm) | -52 to -55 (-dBm) | -69 to -73 (-dBm) |
The results are pretty stunning, aren’t they? The difference between the two is relatively noticeable. Just to remind you, as the value in -dBm gets closer to 0 it becomes more stronger. Since the -dBm scale is logarithmic based, the difference between the two antenna configurations is actually quite large. A difference of -10dBm means that the u.FL antenna has a signal that is 100 times stronger than the SMT antenna at 10 meters away.
Going Further
Now, that you’ve super-charged your Omega’s signal strength, you can use it to make projects where the signal strength is critical or to implement longer-range communication over WiFi. Happy Hacking 🙂