Omega Tip
This week’s tip we’ll go into more detail about I2C communication, particularly using the command line i2cset and i2cget tools. First of all, I2C is an abbreviation for Inter-Integrated Circuit communication and is sometimes called Two-Wire Interface (TWI). It is a serial protocol used to quickly and easily connect multiple devices to controllers and processors such as the Omega2. If you’ve wondered how sensors, controllers, and actuators communicate with the Omega, wonder no more! It is very common for these devices to communicate through I2C.
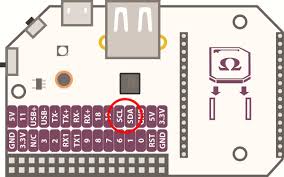
I2C communication is performed over two signal lanes: a clock lane, usually abbreviated to SCL, and a data lane, usually abbreviated to SDA. On the Omega, there are SCL and SDA pins that are available for I2C communication. You will notice them on every Dock as well as on the Omega’s pinout diagram. Additionally, it’s important to note that the I2C protocol uses a master-slave architecture. All this means is that an I2C bus can have many devices attached to it, but a single device in charge and running the show. The master device initiates all communication and interacts with specific devices by using their specific device address. This means that all devices communicate with just the master, and slave devices cannot communicate with other slave devices. The Omega is configured to be an I2C master, and all I2C Expansions, sensors, controllers, etc are slave devices on it’s I2C bus.
So, let’s explore how to interact with an I2C device from the command line!
There are two main commands that are used to work with I2C devices: i2cget and i2cset. Using these commands you are able to access the data that is stored in registers (a location in the memory) on the device and in that way control the device. In order to read or write a byte to an I2C device you need to specify the register, so let’s take a look at commands closely.
i2cget
The i2cget command is used to read a byte from a specified register on the I2C device. The format for this command is as follows:
I2cget [-f] [-y] 0 <DEVICE ADDRESS> <ADDRESS> [MODE]
Let us explained each little chunk of this command.
- [-f] [-y] Options:
-fforce access to the device even if the device is still busy. However, be careful. This can cause thei2cgetcommand to return an invalid value. We recommend avoiding this option.-ydisable interactive mode. Using this command will skip the prompt for confirmation from thei2cgetcommand. By default, it will wait for the confirmation from the user before interacting with the i2c device. We recommend using this option.<DEVICE REGISTER>is an I2C bus address (e.g 0x04)<ADDRESS>is the address on the slave from which to read data (eg. 0x00)- The optional
MODEcan be one of the following: - b – read a byte of data, this is the default if left blank
- w – read a word of data (two bytes)
- c – write byte/read byte transaction
Let us give you an example. Let’s say we have an i2c temperature sensor at address 0x05 acting as a slave with the following registers:0x00– stores temperature in degrees Fahrenheit and0x01– stores temperature in degrees Celsius. We want to read the temperature in Fahrenheit so our command will be as follows:
I2cget -y 0 0x05 0x00
Let’s say this returns 0x48, which is not expected, right? But remember, this byte is represented in hexadecimal values. If you convert 0x48 into decimal you would get 72, which is pretty nice weather, isn’t it? Now, let’s take a close look at how to write data to I2C devices.
i2cset
We’ll use the i2cset command to write data to an I2C device. The format of this command as follows:
I2cset -y 0 <DEVICE ADDRESS> <ADDRESS> <VALUE>
Does it seem familiar? You got it, the syntax and its description is almost the same as for i2cget except for the new parameter. This parameter is the data that will be written to the device at the specified <ADDRESS>. With most I2C devices, the <ADDRESS> points to a memory mapped register on the device, and the is the data to be written to the specified register.
However, if the <VALUE> is omitted, only the value in <ADDRESS> will be written to the device. This may come in handy since not all I2C devices have memory mapped registers!
So, let’s say you have an I2C light controller at address 0x15 that acts as a slave device with the following memory mapped registers: 0x00 – green light, 0x04 – red light and 0x08 – blue light. We’ll use 0x00 for OFF position and 0x01 for ON.
For example, let’s say you want to turn the green lights ON and the reds lights OFF, so here we are:
I2cset -y 0 0x15 0x00 0x01
I2cset -y 0 0x15 0x04 0x00
So, the first line writes the value 0x01 (switch ON) to the address 0x00 (green lights) on the device with address 0x15 (our I2C light controller) and the second line sets 0x00 (switch OFF) to the address 0x01 (red light) on the device with address 0x15. Or we can say: “Hey light controller, please turn on the green light and turn off the lights red light!”
Going Further
This provided an overview of how to use command-line tools to communicate with I2C devices. Now that you know this, you can quickly write scripts that will can interact with all sorts of different I2C devices. Once you feel that you’ve done everything you can with i2cget and i2cset, it’s most likely time to start using Python to communicate with I2C devices. Take a look at our I2C Python module for more details.