
HI EVERYONE!
Welcome back to 2-Bullet Tuesday,where we’ll share useful tips and awesome stuff sent in by Omega2 users all around the world.
Favorite Project
Omega Car Remote
Our favorite project this week is a WiFi remote control and starter for a car made by Daniel Velazquez. It allows you to use a phone or computer to access to your car remotely; control the courtesy lights & headlights, monitor and share the car’s performance statistics, and even unlock the doors and start the engine!

Daniel built a circuit that powers the Omega using the car battery and connects the Omega’s GPIOs to the car’s electronics (through relays or transistors, depending on the voltage of the connected system). This enables the Omega to control the car! By connecting his smartphone to the Omega’s WiFi access point, he can remotely send commands to the car to unlock the doors or start the engine!
Absolutely amazing project, Daniel. We can’t wait to see what you make next!
Omega Tip
I2C with the Arduino Dock 2
We’re continuing our series of tips on using the Arduino Dock 2 as a co-processor for the Omega2. This week, we’ll be implementing I2C communication between the Omega and microcontroller – making the microcontroller behave more like a peripheral device.
Just like last week, we will use the microcontroller to obtain values from an analog sensor and send it over to Omega2. But this time, the microcontroller will be acting as an I2C slave device connected to the I2C bus of the Omega. This may come in handy if the Omega needs to use its UART1 to communicate to a different device, or if the reading from the microcontroller is being used alongside readings from other I2C devices.
So, let’s get started! The following is a list of ingredients that will be used:
- Omega2 or Omega2+
- Arduino Dock 2
- TMP36 Analog Temperature Sensor
- 3x jumper wires

The setup is exactly the same as last week, but the behavior is different. We will perform the following operations on the microcontroller:
- Continuously read the analog voltage input and convert it to a human-readable temperature
- Implement a set of I2C accessible registers
- When the I2C register corresponding to “Get Temperature” is read by the Omega, the most recent reading from the temperature sensor will be returned. (Basically, the temperature values are being read constantly. When you request to read (“ask”) from a specific register on the microcontroller, it returns (“answers”) the value at the time you ask for it.)
- Transmit the data to the Omega when requested over I2C
On the Omega, we’ll implement a script to read the data from the microcontroller, and nicely print it to the command line.
Sound a little daunting? Don’t worry, we’ll guide you through every step so that you can understand the concept and the implementation! Effectively, the microcontroller will behave like any other I2C-based sensor.
Ready, set, wire up! We’ll be connecting the temperature sensor to an analog pin of the ATmega microcontroller, and we’ll reference it to VCC (5V) and GND so we can make sure the data is accurate.
- Plug the Omega2 into the Arduino Dock 2 and power it up
- Plug the TMP36 into the breadboard
- When looking at the flat side of the device, connect the right pin to
GND, the middle pin toA0, and the left pin to5V VCC(Just like last week)

Now that the hardware part is done, let’s go ahead and write Arduino Sketch C code to do the following:
- Continuously read the sensor’s analog voltage and convert it into Celsius and Fahrenheit temperature readings
- Register the microcontroller as an I2C slave device with its ownits I2C address
- Implement the I2C communication between the Omega and Microcontroller
- Receive and transmit the bytes of data (receive from the Omega and transmit a single byte at a time back to the Omega)
Let’s take look at the code – also available on GitHub:
The next step is to flash this sketch to the Arduino Dock 2; please refer to our guide on how to flash the Arduino Dock wirelessly.
In this code we are using the Wire library to implement I2C communication. See the full description of the Wire library if you’re interested in the details.
In the setup() function we initialize the I2C interface when we set the slave’s address and set two handler functions (also known as callback functions) for specific events: Wire.onReceive(receiveEvent) and Wire.onRequest(requestEvent).
Let’s start with Wire.onReceive(). This is used to set a function to be called when the microcontroller receives a transmission from the I2C bus master. The function must take an integer argument, the number of received bytes, and return nothing. So in our code, we set our receiveEvent() function to be called whenever I2C data is received. In the function itself, we have a for loop to go through all the received bytes. It will store the very first received byte (since that’s the only one we currently care about) and then clear the buffer by reading the rest of the received bytes. If the buffer isn’t cleared, subsequent reads won’t work the way you expect!
Similarly, Wire.onRequest() is used to set a function to be called when the I2C bus master is requesting data. The function must take no arguments and must not return any values. In our code, we specify the requestEvent() function as the handler function when data is requested.
Basically, when we issue the command i2cget -y 0 [DEVICE ADDRESS] [REGISTER ADDRESS] on the Omega, the following operations take place:
- The Omega writes the value
[REGISTER ADDRESS]to the device specified by the[DEVICE ADDRESS], in our case, the microcontroller - On the microcontroller, the
receiveEvent()function will execute- We analyze the data that was received and identify what reading the I2C master is requesting by setting a global variable as a flag
- The I2C master will then request data, so the
requestEventfunction will get executed- The microcontroller uses the global variable to respond with the data that was requested
So, working together, the receiveEvent() and requestEvent() functions implement I2C communication.
The rest of the code should be familiar, it reads the sensor and then splits the temperature data into integer and fractional parts since we’re transmitting 1 byte at a time through I2C.
Now, let’s take a look to our I2C master device, the Omega2. We want to read from a specific register on our I2C slave microcontroller. A typical command to read data from a register is as follows:
i2cget -y 0 [DEVICE ADDRESS] [REGISTER ADDRESS]
In our case, issue the following sequence of commands:
root@Omega-F04D:~# i2cget -y 0 0x08 0x00
0x17
root@Omega-F04D:~# i2cget -y 0 0x08 0x01
0x52
root@Omega-F04D:~# i2cget -y 0 0x08 0x02
0x4a
root@Omega-F04D:~# i2cget -y 0 0x08 0x03
0x58
root@Omega-F04D:~# i2cget -y 0 0x08 0x09
0xff
We do 4 different reads from the I2C device with an address of 0x08 in order to receive the integer and fractional parts of the temperature in both Celsius and Fahrenheit.
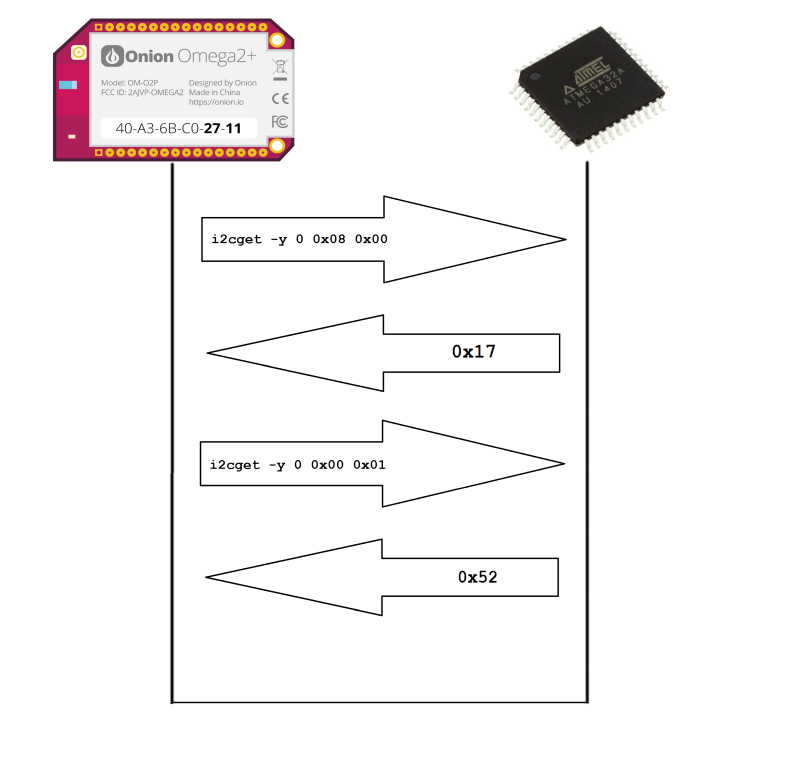
The dialogue between the Omega (I2C master) and microcontroller (I2C slave) looks something like this:
- Omega: Hey microcontroller, what is the integer part of the Celsius reading?
- Microcontroller: It is 0x17 (Which is 23 in decimal)
- Omega: Okay, how about the fractional part?
- Microcontroller: It is 0x52 (Which is 82 in decimal)
- Omega: Ohh, so the actual Celsius temperature is 24.82°C
The last part is done with a little bit of computation on the Omega’s side. Take a look at the Python code we’ve written to request the partial weather readings, combine them into actual temperatures, and output them to the command line in a human-readable format:
Just copy the code to a file on your Omega and execute. However, you will first need to install the pyOnionI2C Python module in order to use the onionI2C library, take a peek at the required commands below:
opkg update
opkg install python pyOnionI2C
opkg upgrade libonioni2c pyOnionI2C
Now, when you are all set and ready to communicate with the Arduino Dock 2 via I2C, you can go ahead and issue the following command to run the Python script:
root@Omega-F04D:~# python request_and_receive.py
Celsius:  24.75°C
Fahrenheit:  76.52°F
And that’s it! You just have learned how to turn your microcontroller into an I2C slave device and request readings from the analog temperature sensor using your Omega2 as a I2C master device. Let’s cover what we’ve learned:
- Continuously read the analog voltage input and convert it to a human-readable temperature
- Communicating the results to the Omega by implementing a set of I2C accessible registers
- Monitor the collected data and print the requested temperature
We hope that this intro to microcontroller I2C communication will spark your imagination for your own projects!
Thanks for reading & have a great week!